General Scholz shares a sausage with Prince William. 1815
Another exciting narrative of one our very international player group’s many fights in the Alternative to Waterloo campaign a few years back.
NAPOLEONIC
Richard Bird
3/20/20247 min read
Background to Floreffe
A few years ago, our group made the decision to launch a Waterloo campaign. One of the reasons was that it made sense of wargaming and gave it structure. Fighting divisional battles with balanced forces was a highly social event but lacked spark and purpose. A campaign puts us in the shoes of a commander who has limited information, concerns over lines of communication and logistics, and the myriad of situations he has to be aware of.
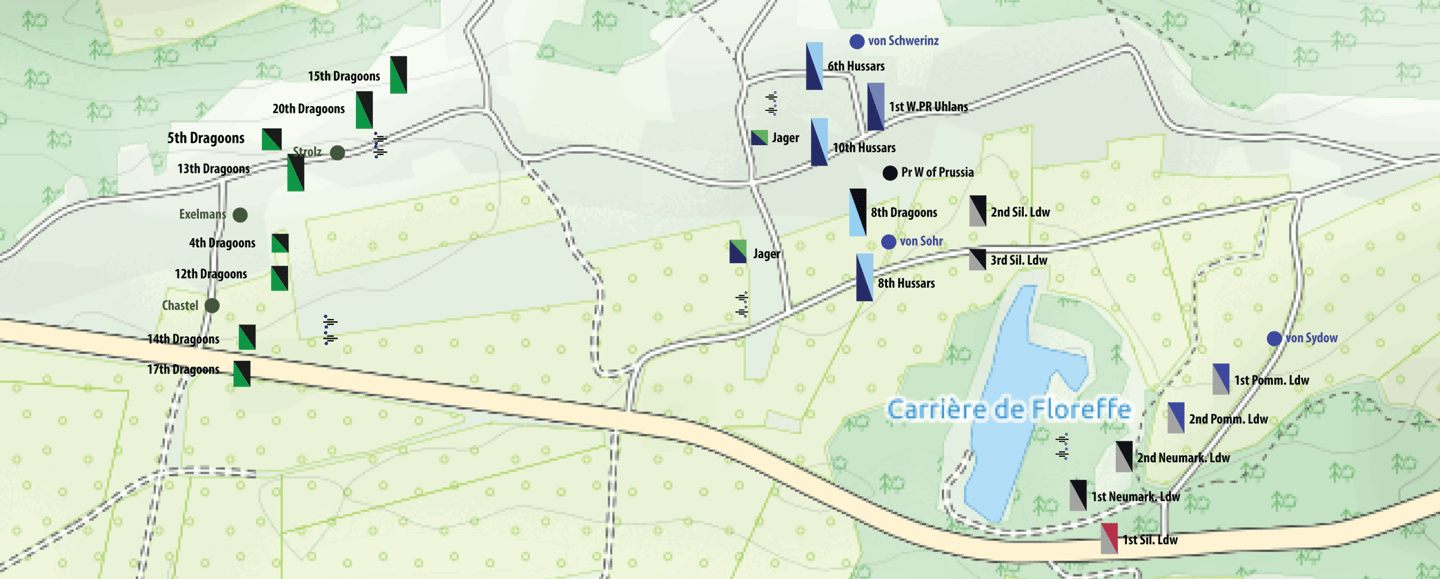
Not all of the battles were played on the tabletop, mainly due to the availability of players and the occasional need to keep the momentum of the campaign going. The way these battles were fought was on a map. I would create the map and scale it within Adobe Illustrator to match the same scale as the rules. Illustrator’s ruler tool is then used like a tape measure in a tabletop game. The icons were very simply done in the same application and again scaled. I have been doing this for years, and it is a great way to test out rules too.
As umpire, I would often play the game solo, but within the strict bounds of the campaign player’s orders and instructions. These players could, of course, have a copy of the map at each stage/turn of the battle in case they wished to issue new orders. WhatsApp or email were our aide de camp. Now, on to the battle, played out to the south of the Sambre river between Namur and Charleroi.
Turn 1. French Dragoons' Pursuit: A Race to Charleroi
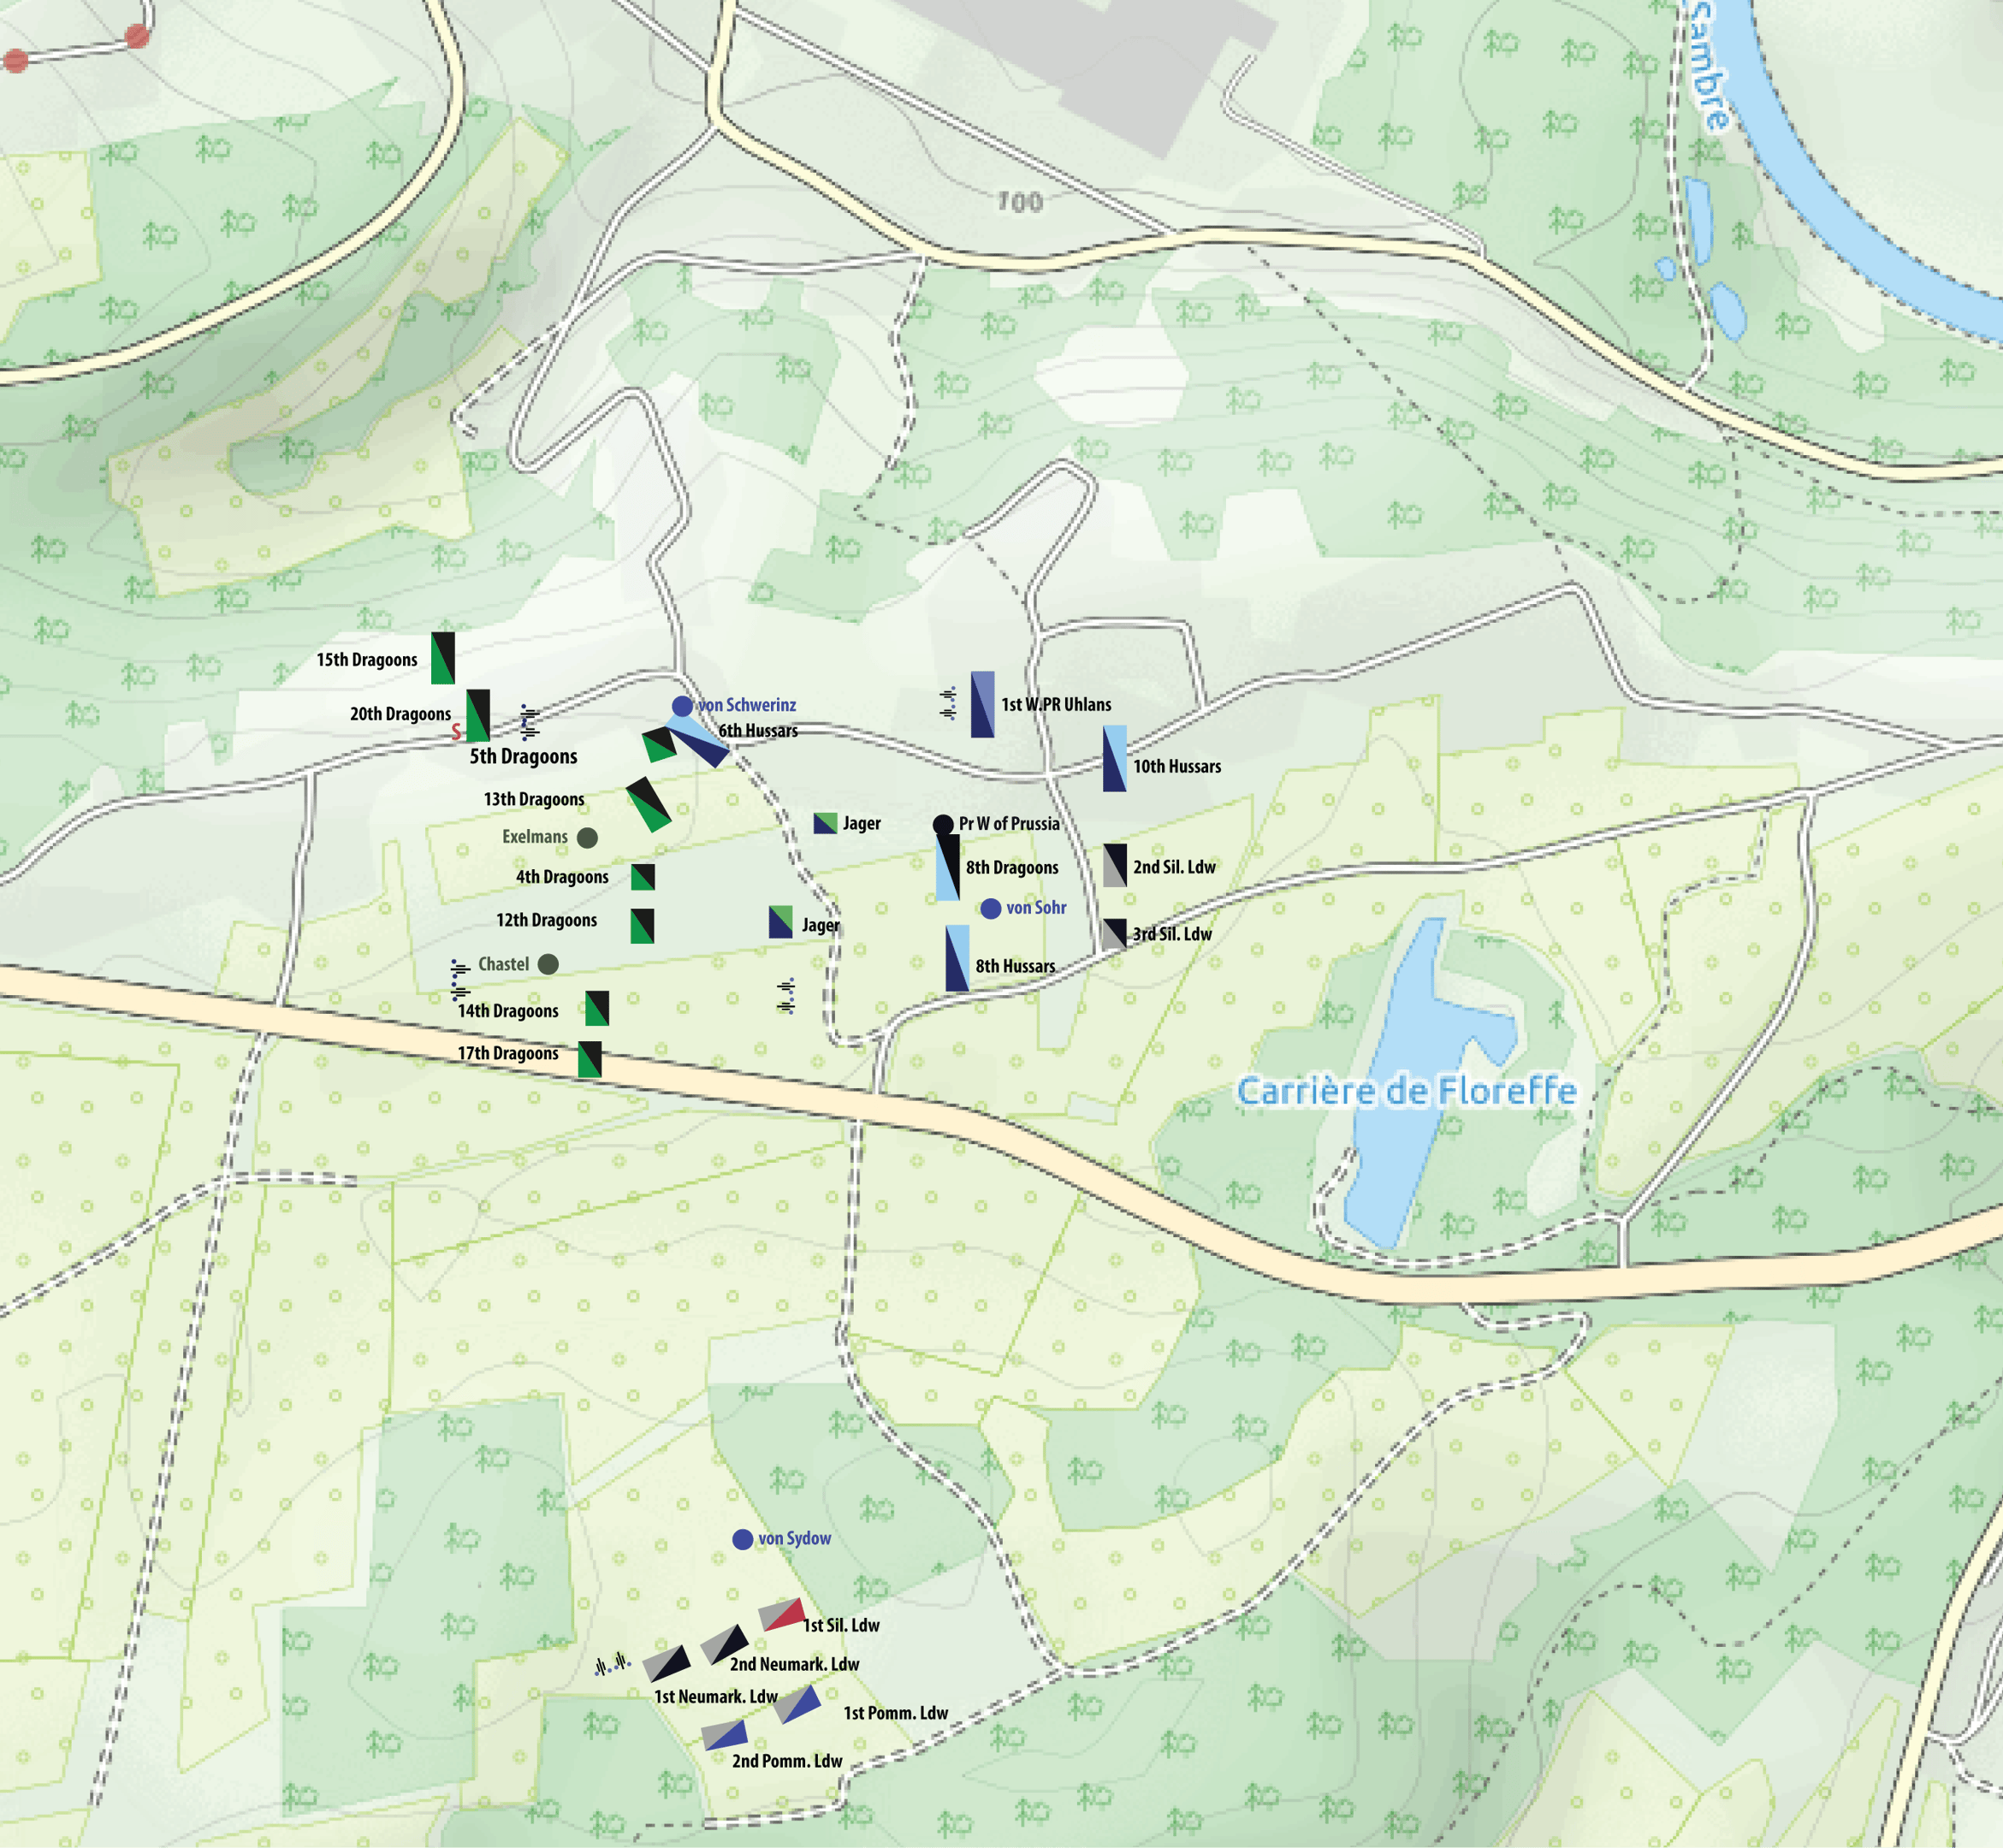
GD Exelmans Corps of French Dragoons, under orders to join Napoleon near Charleroi, successfully pursued the retreating Prussians after their setback at Walcourt. Prince William of Prussia, commanding the fairly fresh 4th Korp Reserve cavalry, had been ordered by the experienced Bulow to march ahead to rejoin Blucher near Charleroi, who had raced there after Walcourt. William received information from the locals and scouts that a force of French cavalry was also marching in the same direction. Setting off in pursuit, they caught up with them near the village of Floreffe. The Prince was surprised to find not one but two French Dragoon divisions commanded by experienced and charismatic leaders. He had several good regiments, but half his force were Landwehr. He halted and deployed horse artillery and mounted Jager. Von Sydow, with his Landwehr cavalry, was sent off to find a flanking route along a track to the left flank. Exelmans, having got wind of the Prussians, deployed his veteran dragoons in readiness.
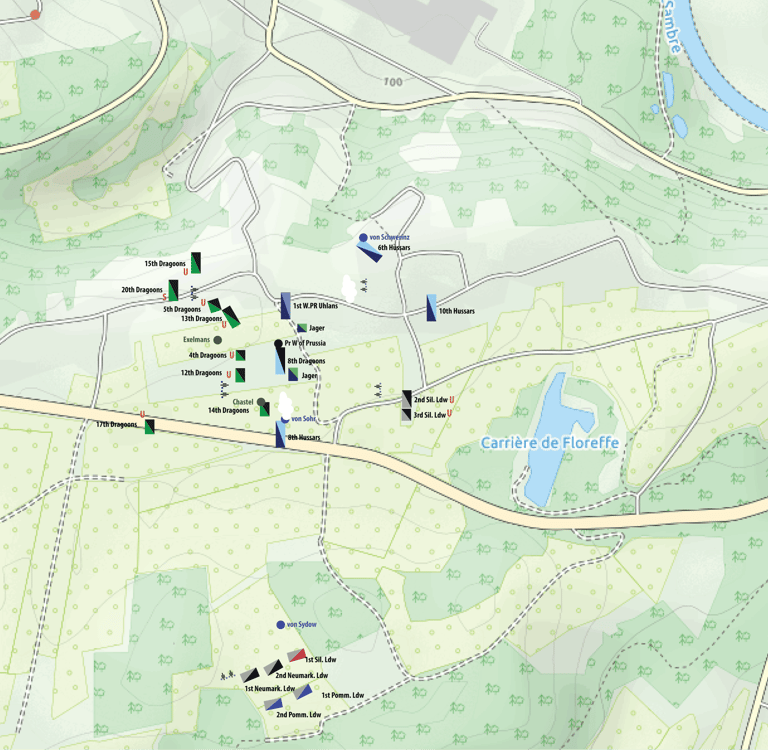
Turn 2. Prince William's Dilemma: Encounter near Floreffe
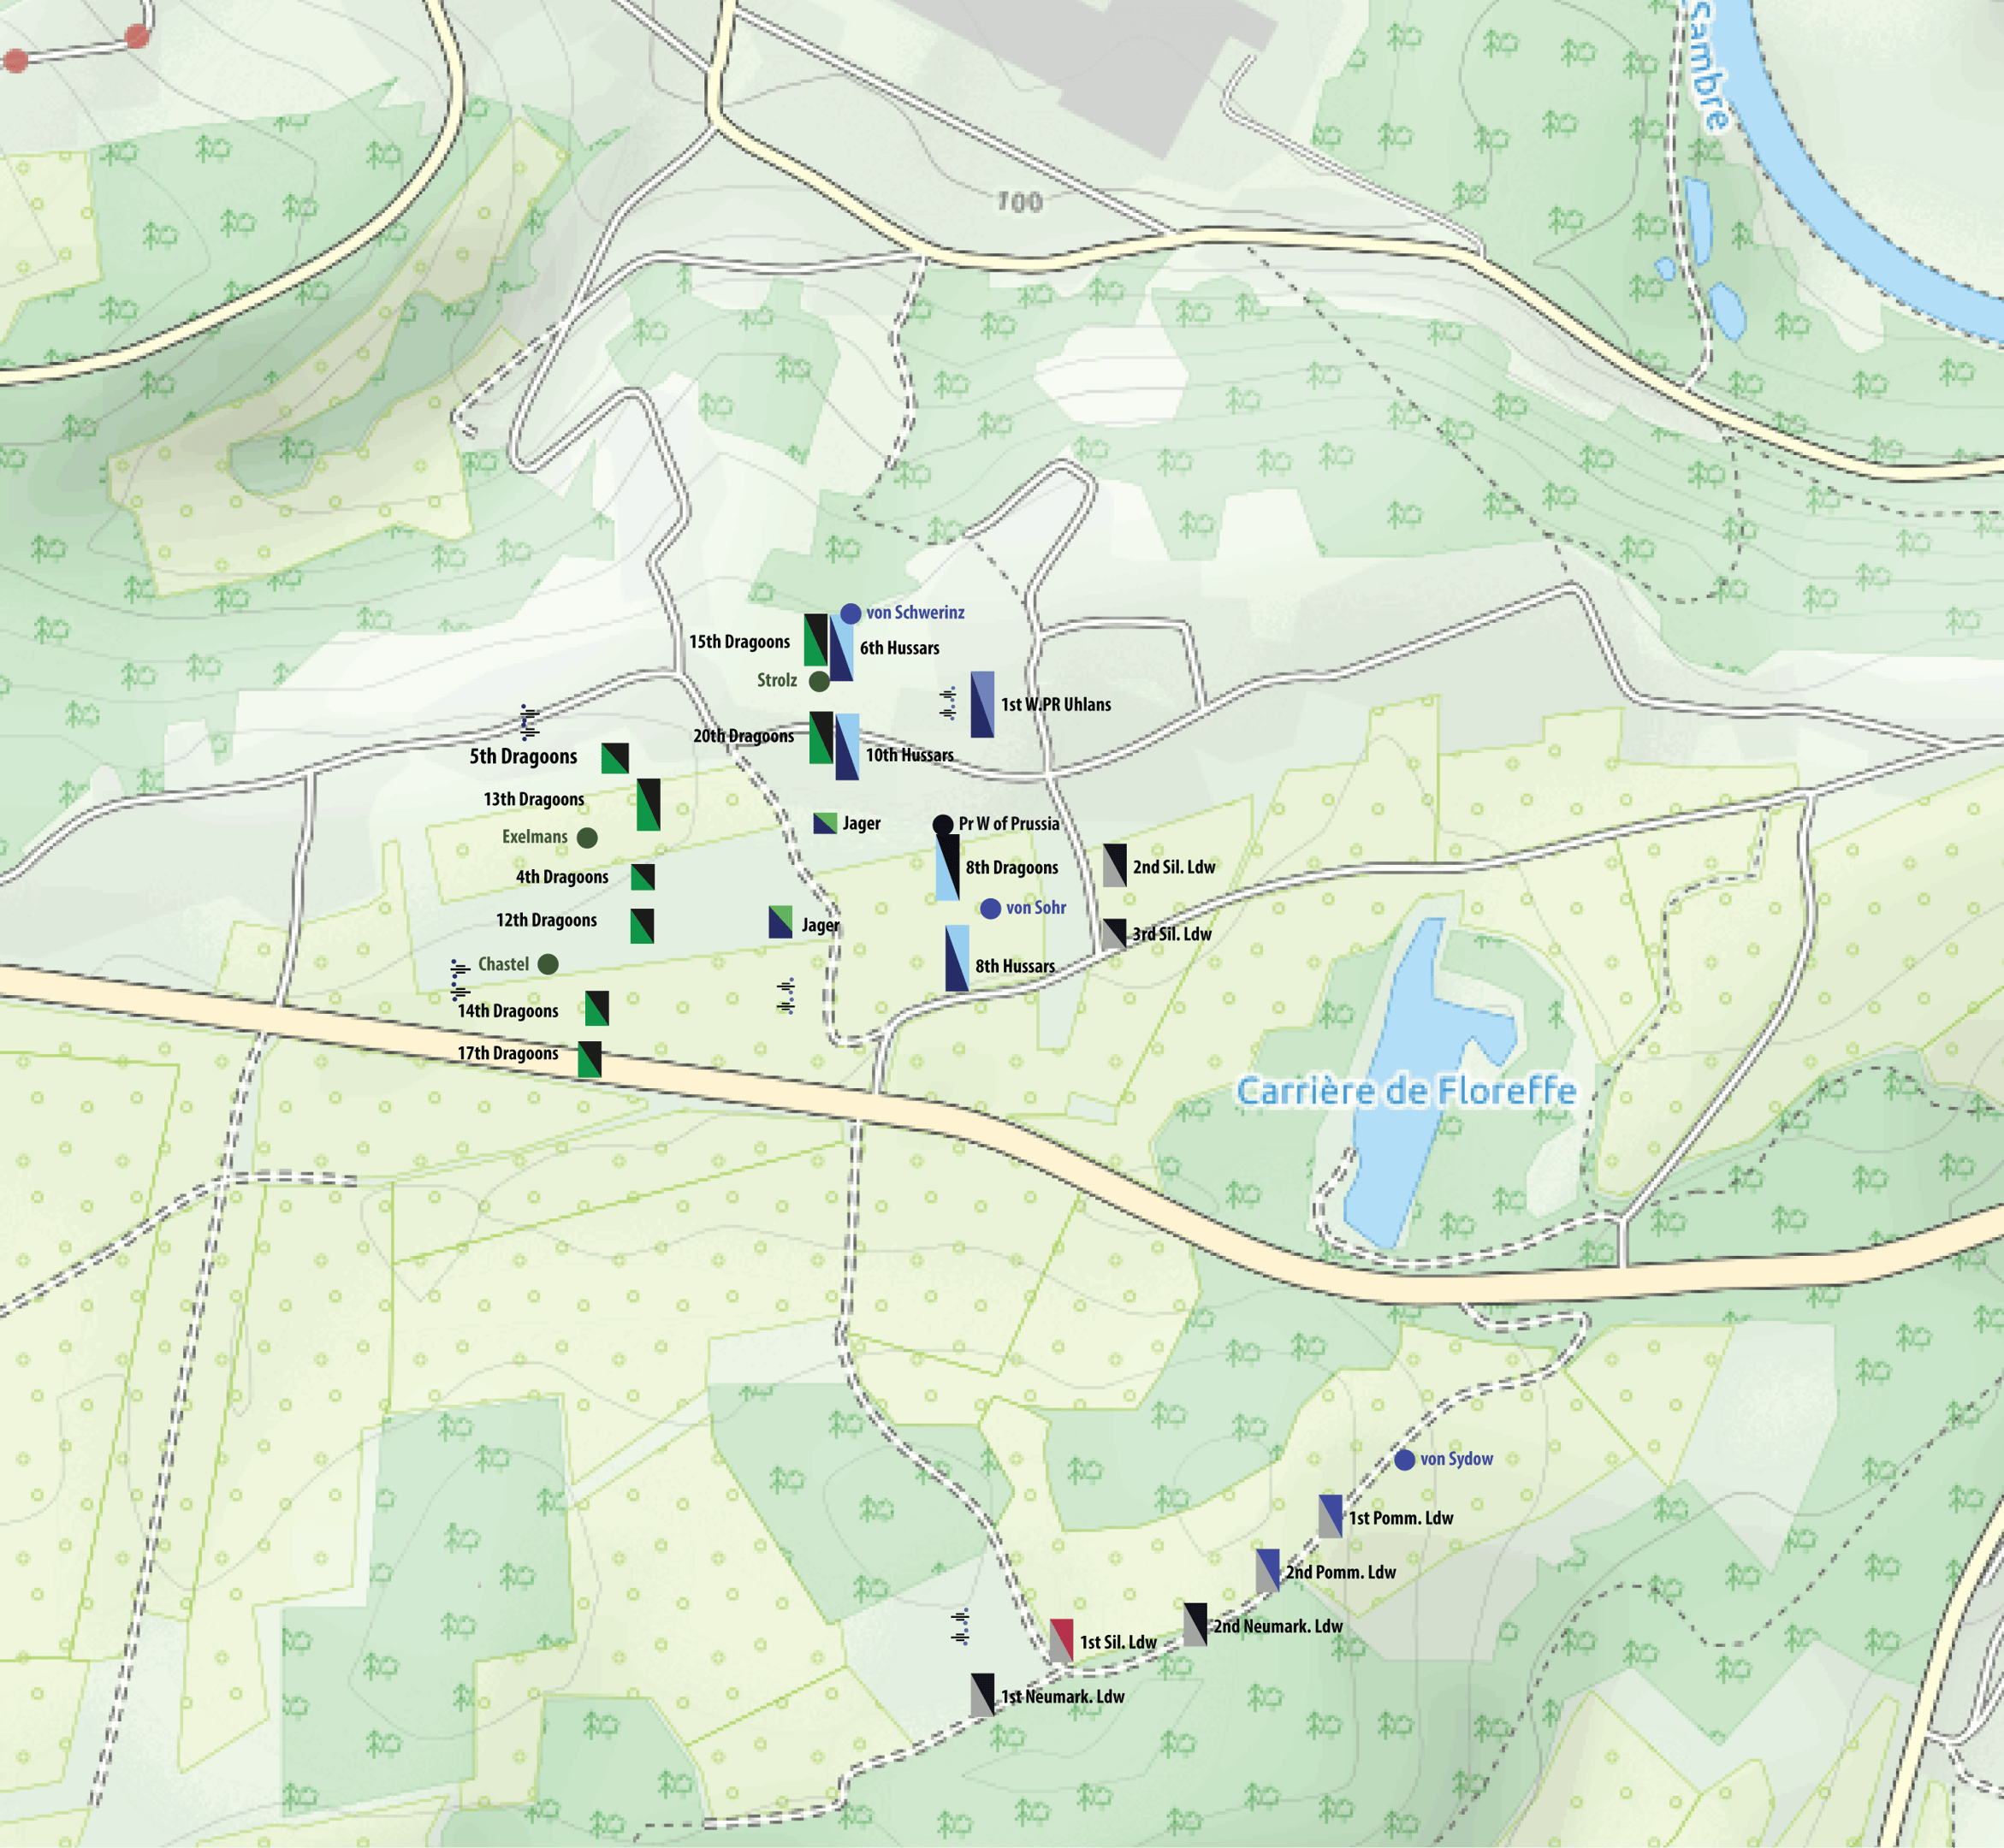
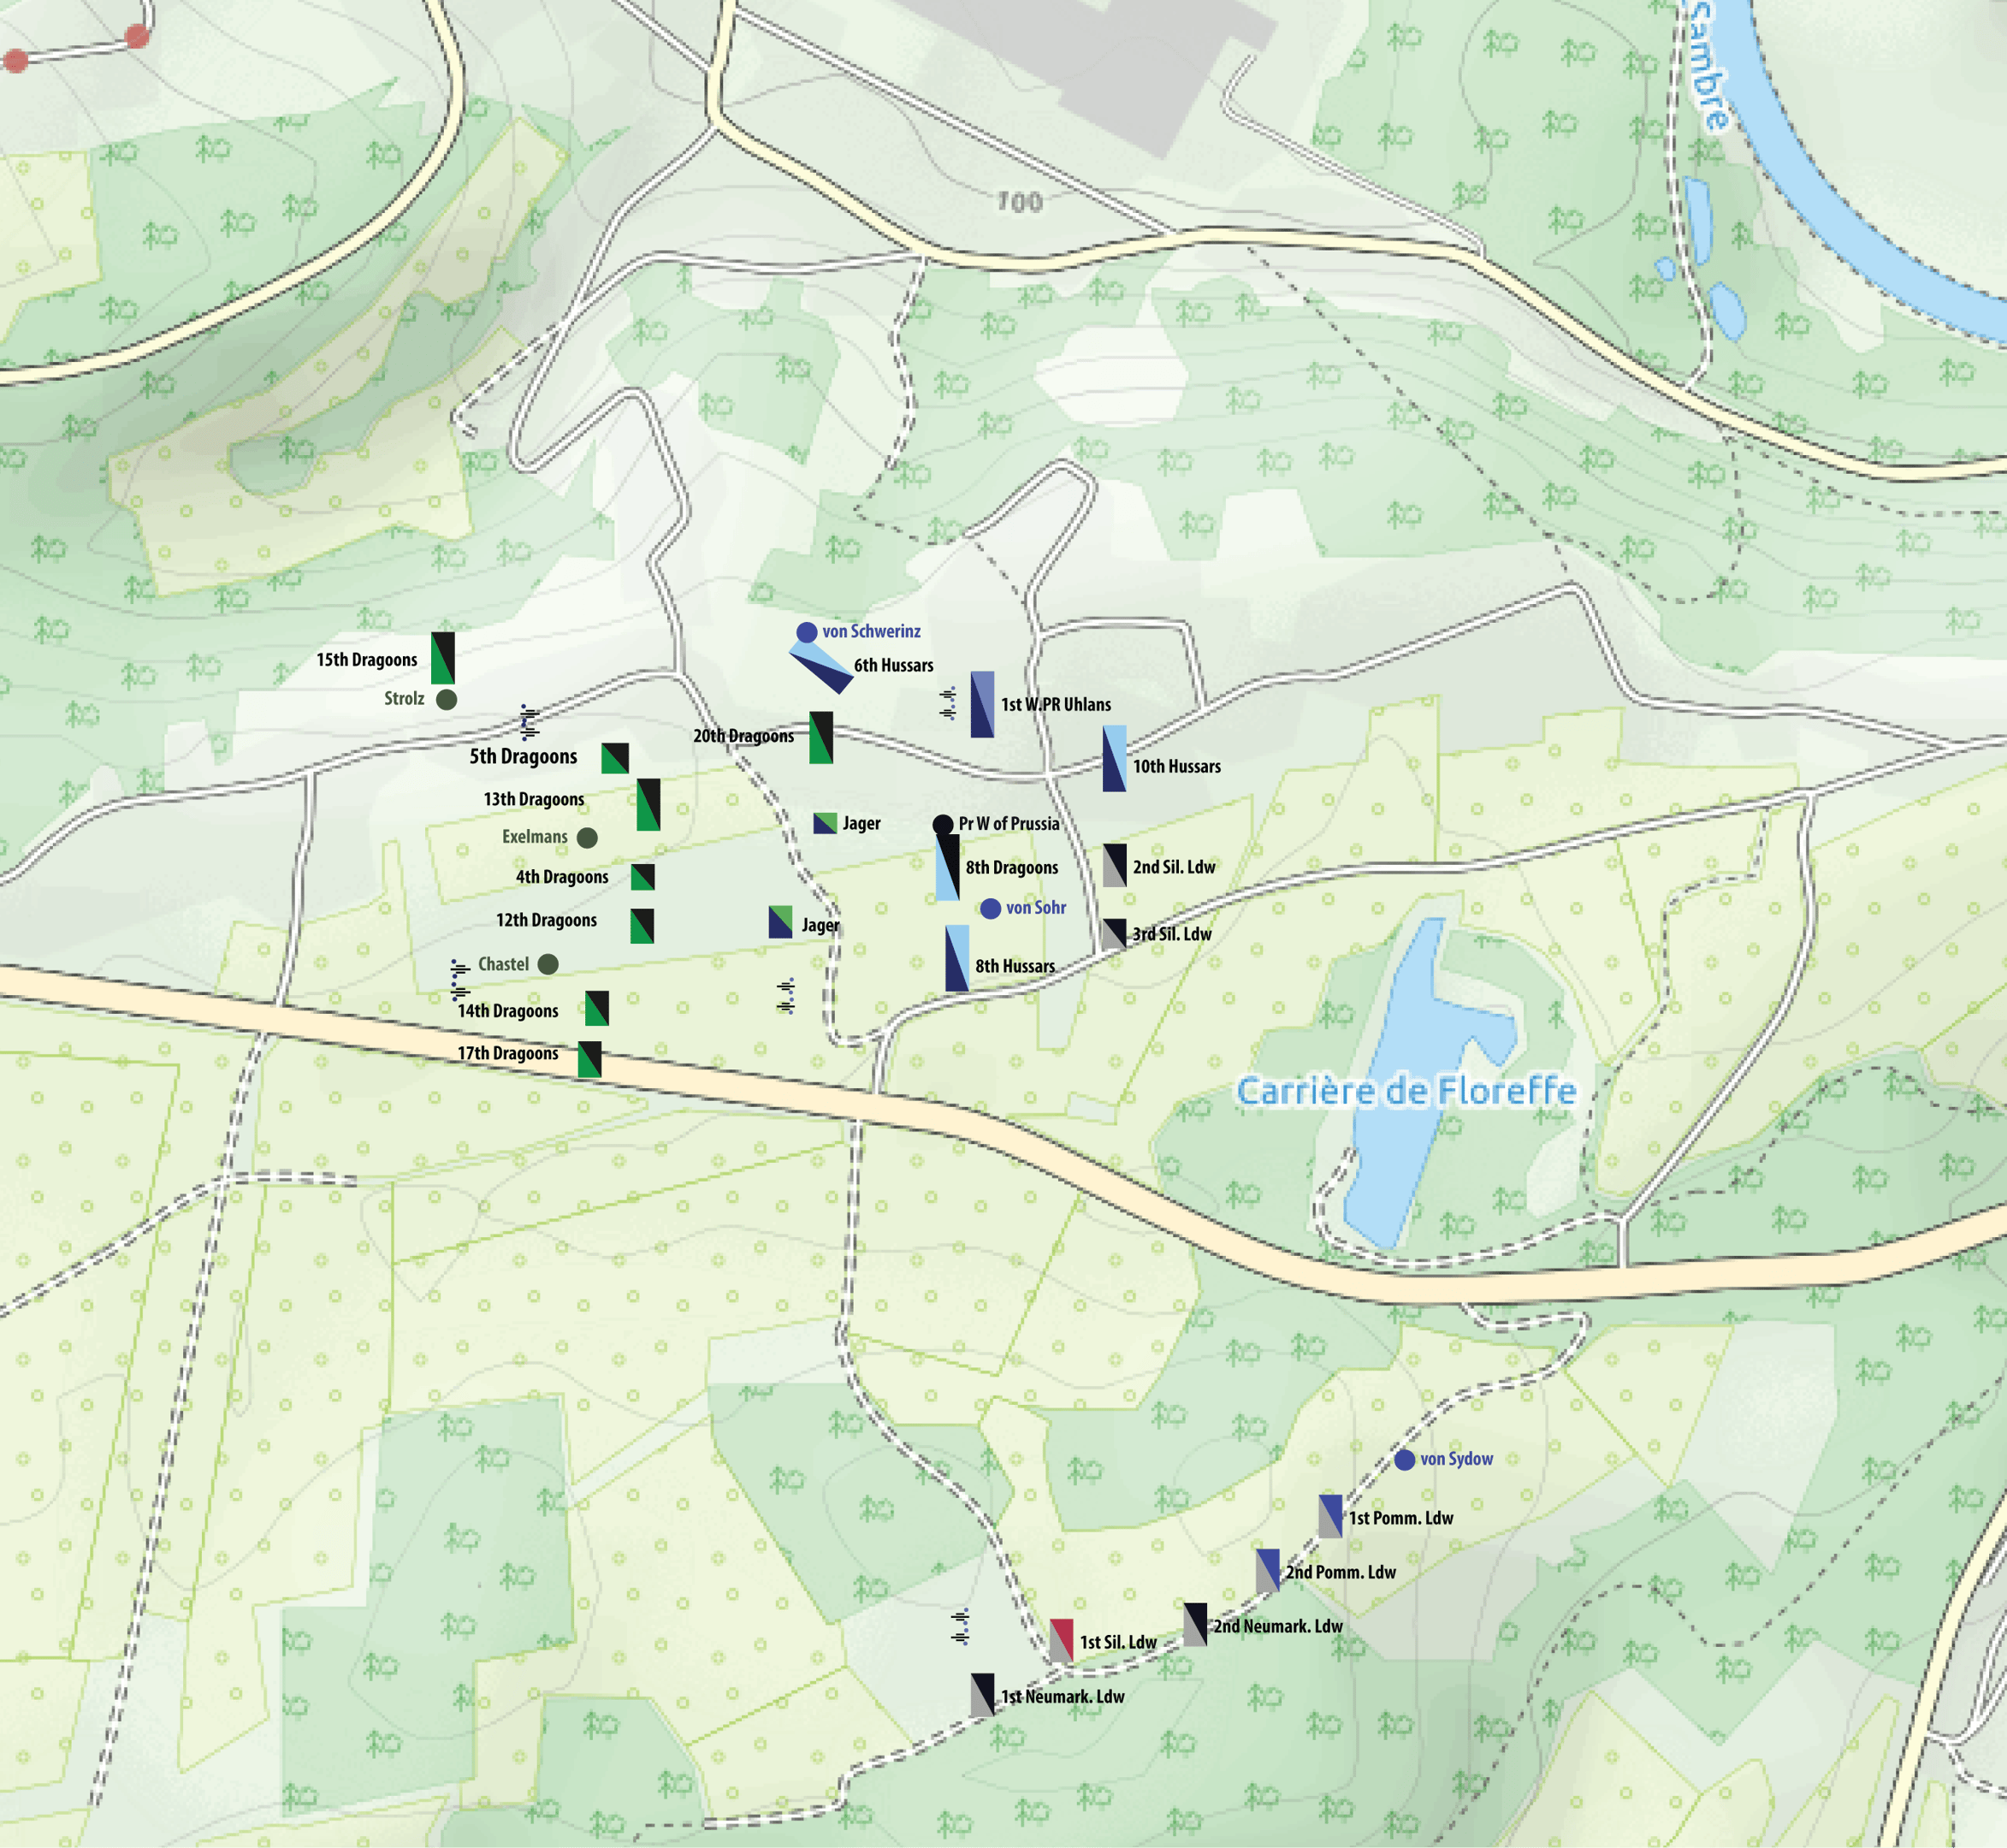
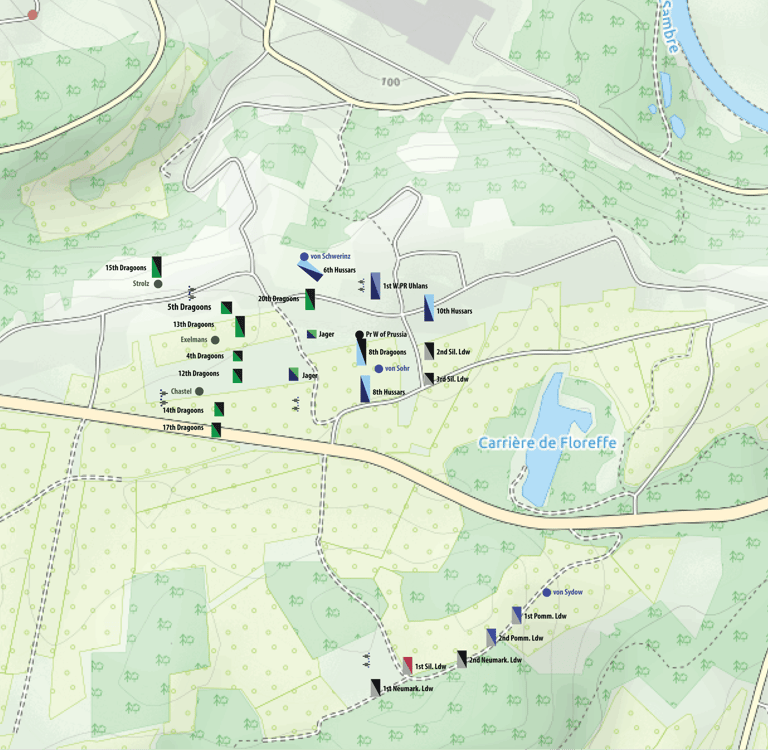
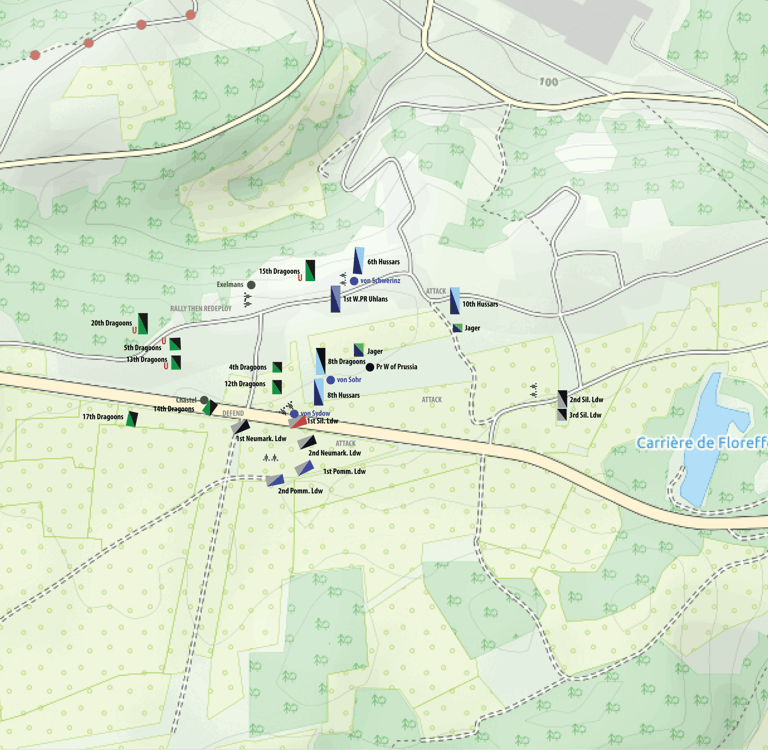
The Prince deployed his troops; von Schwerin’s brigade of Hussars and Uhlans took the right, and von Sohr’s brigade of dragoons and Hussars, supported by two small Silesian Landwehr units, took the left. The Prince had gambled that von Sydow, not one of Prussia’s finest, would motivate his Landwehr brigade and not get lost. He was risking a great deal. Von Sydow had indeed found a track that took him behind a length of wooded terrain, which shielded his presence. His march was steady, if not dynamic. Exelmans was considering his options. Although he had two divisions, they had seen action, and some units were weaker than hoped.

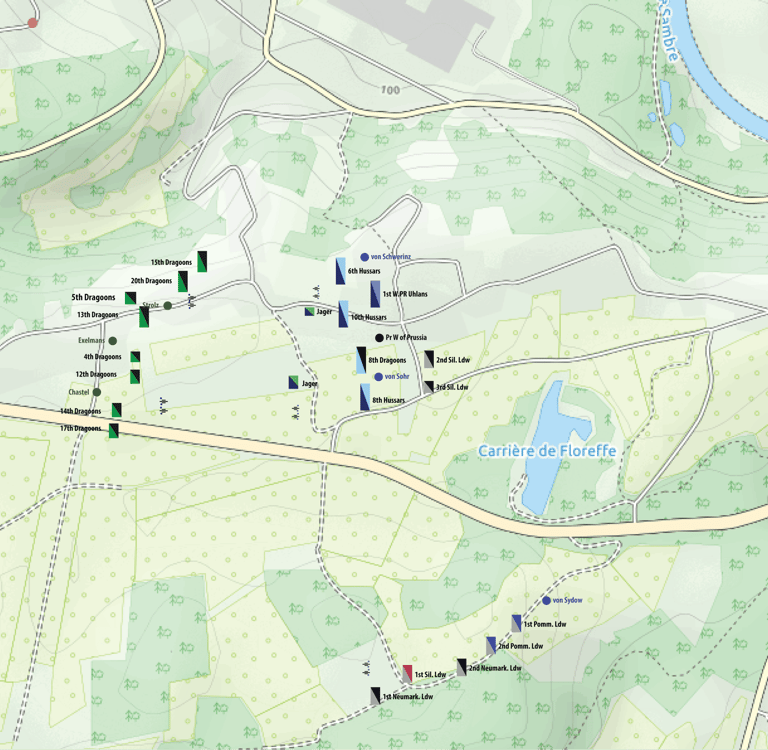
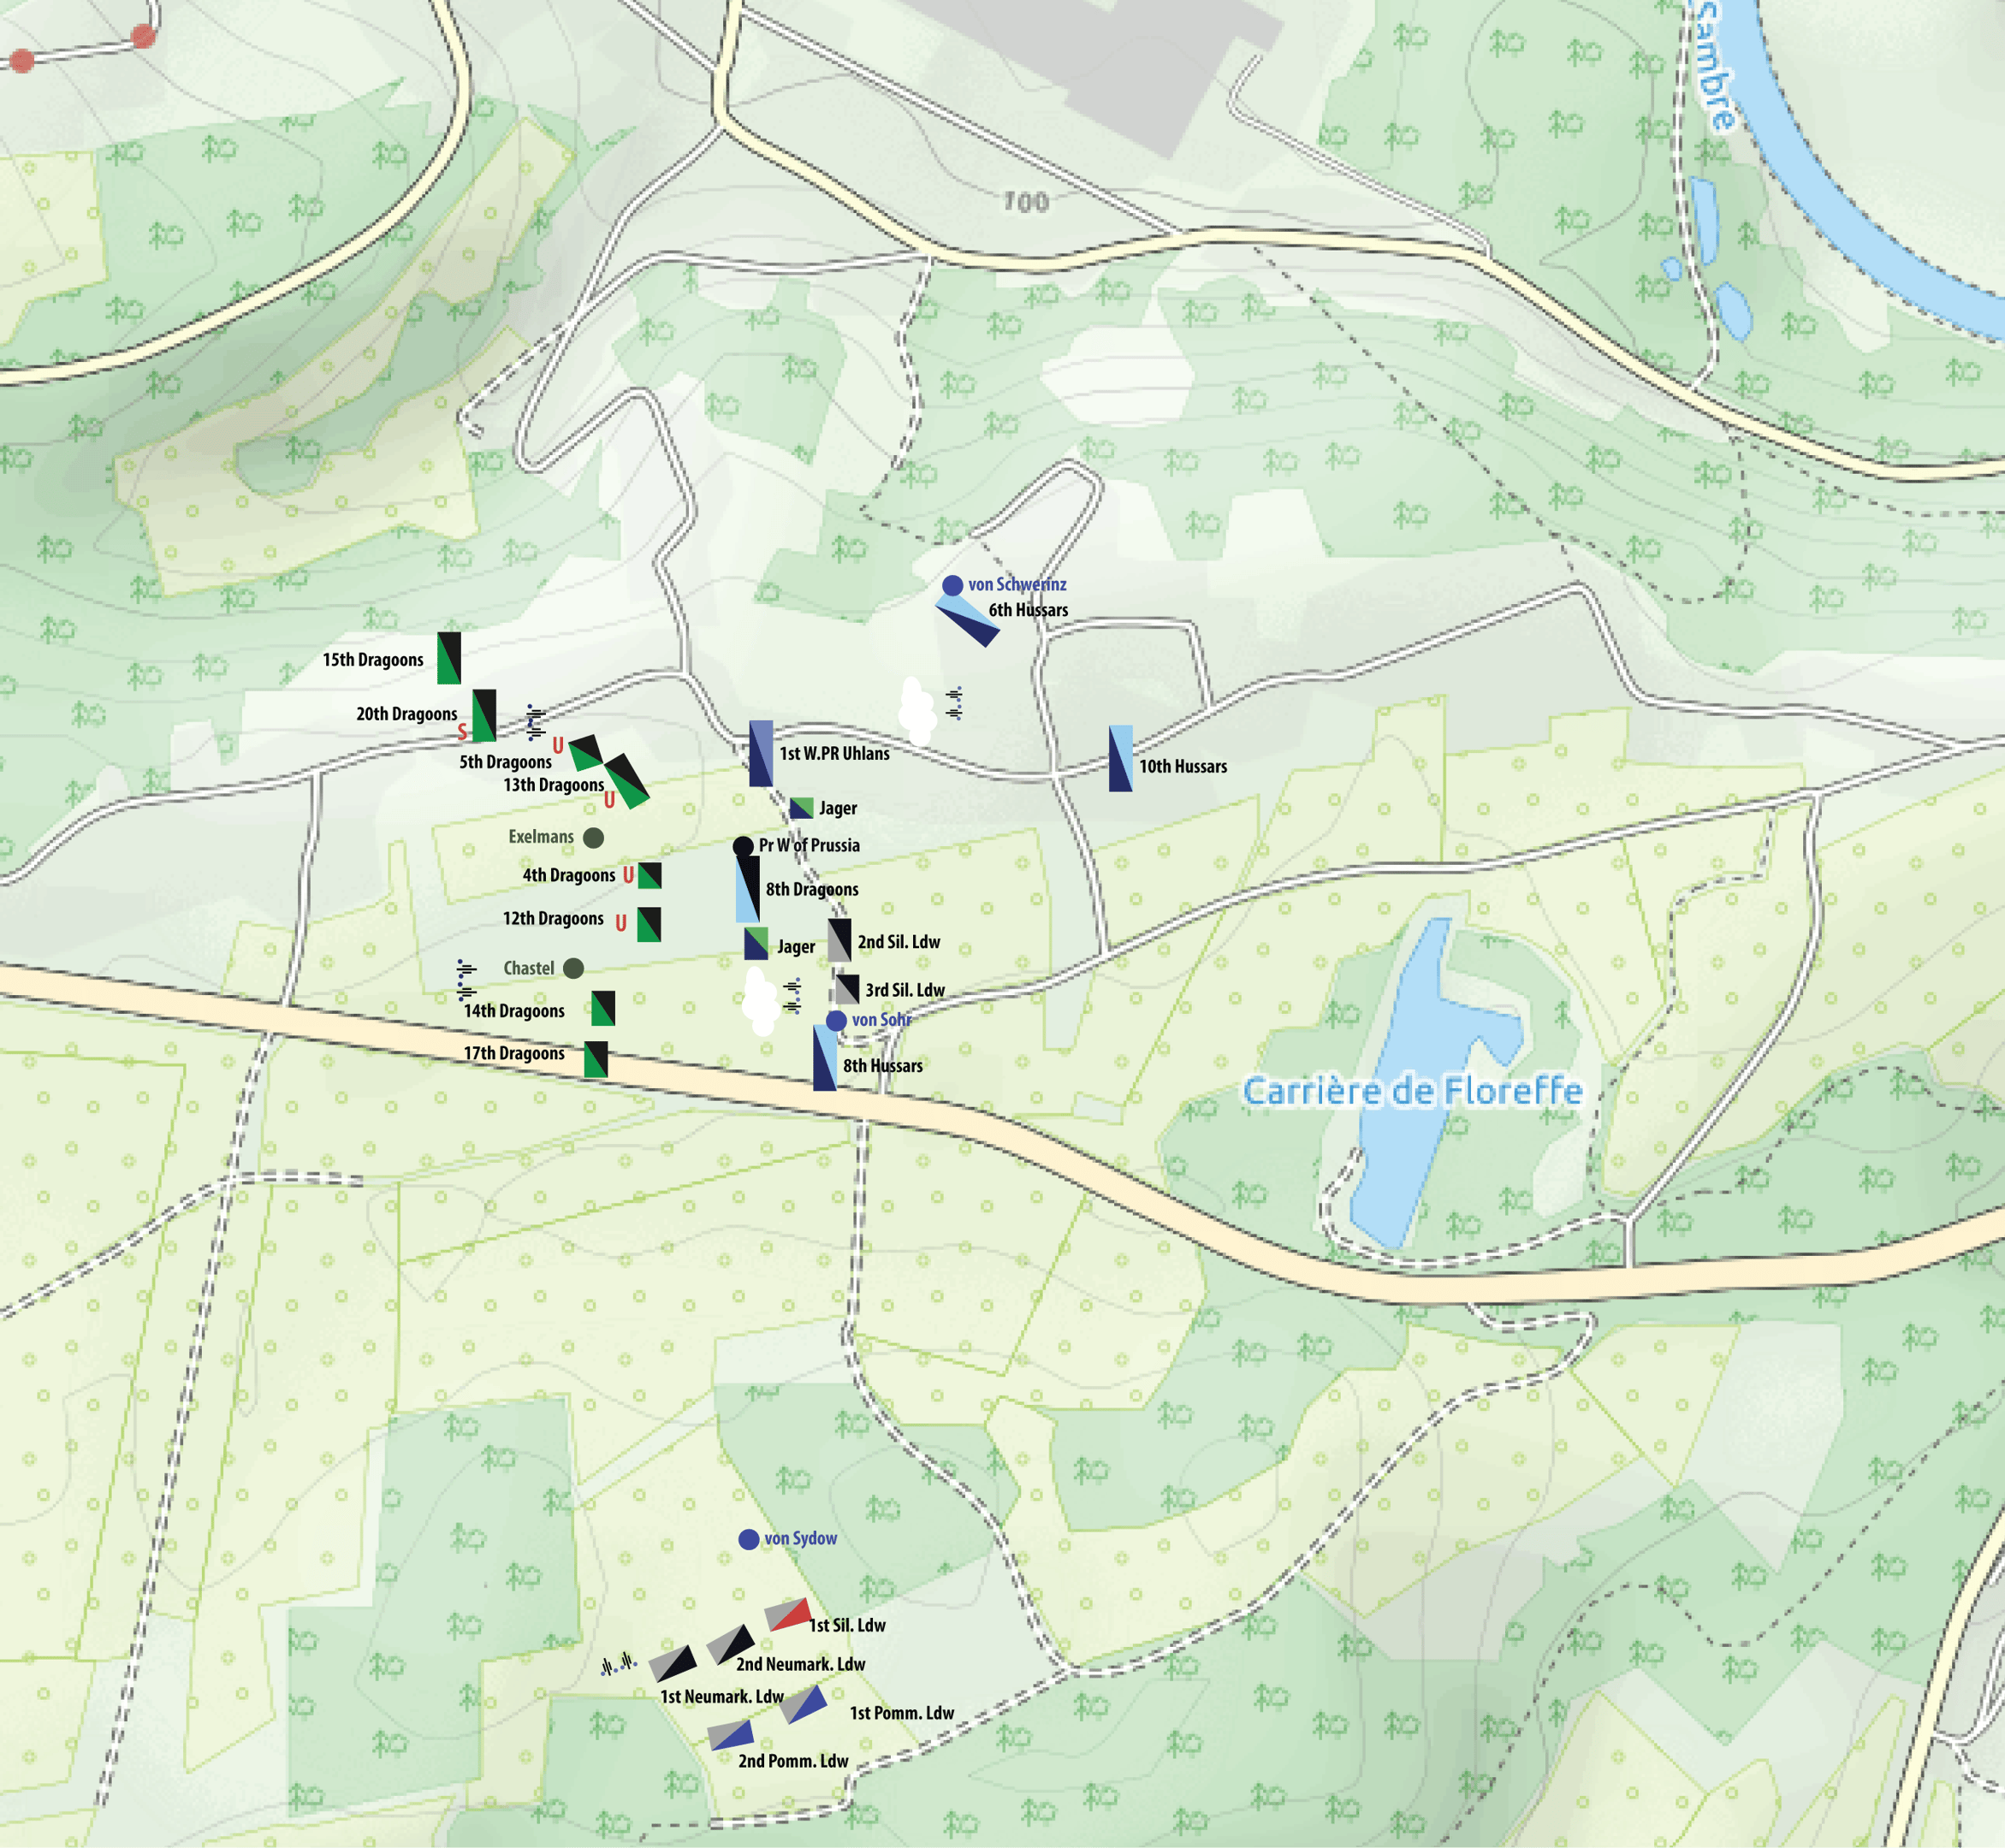
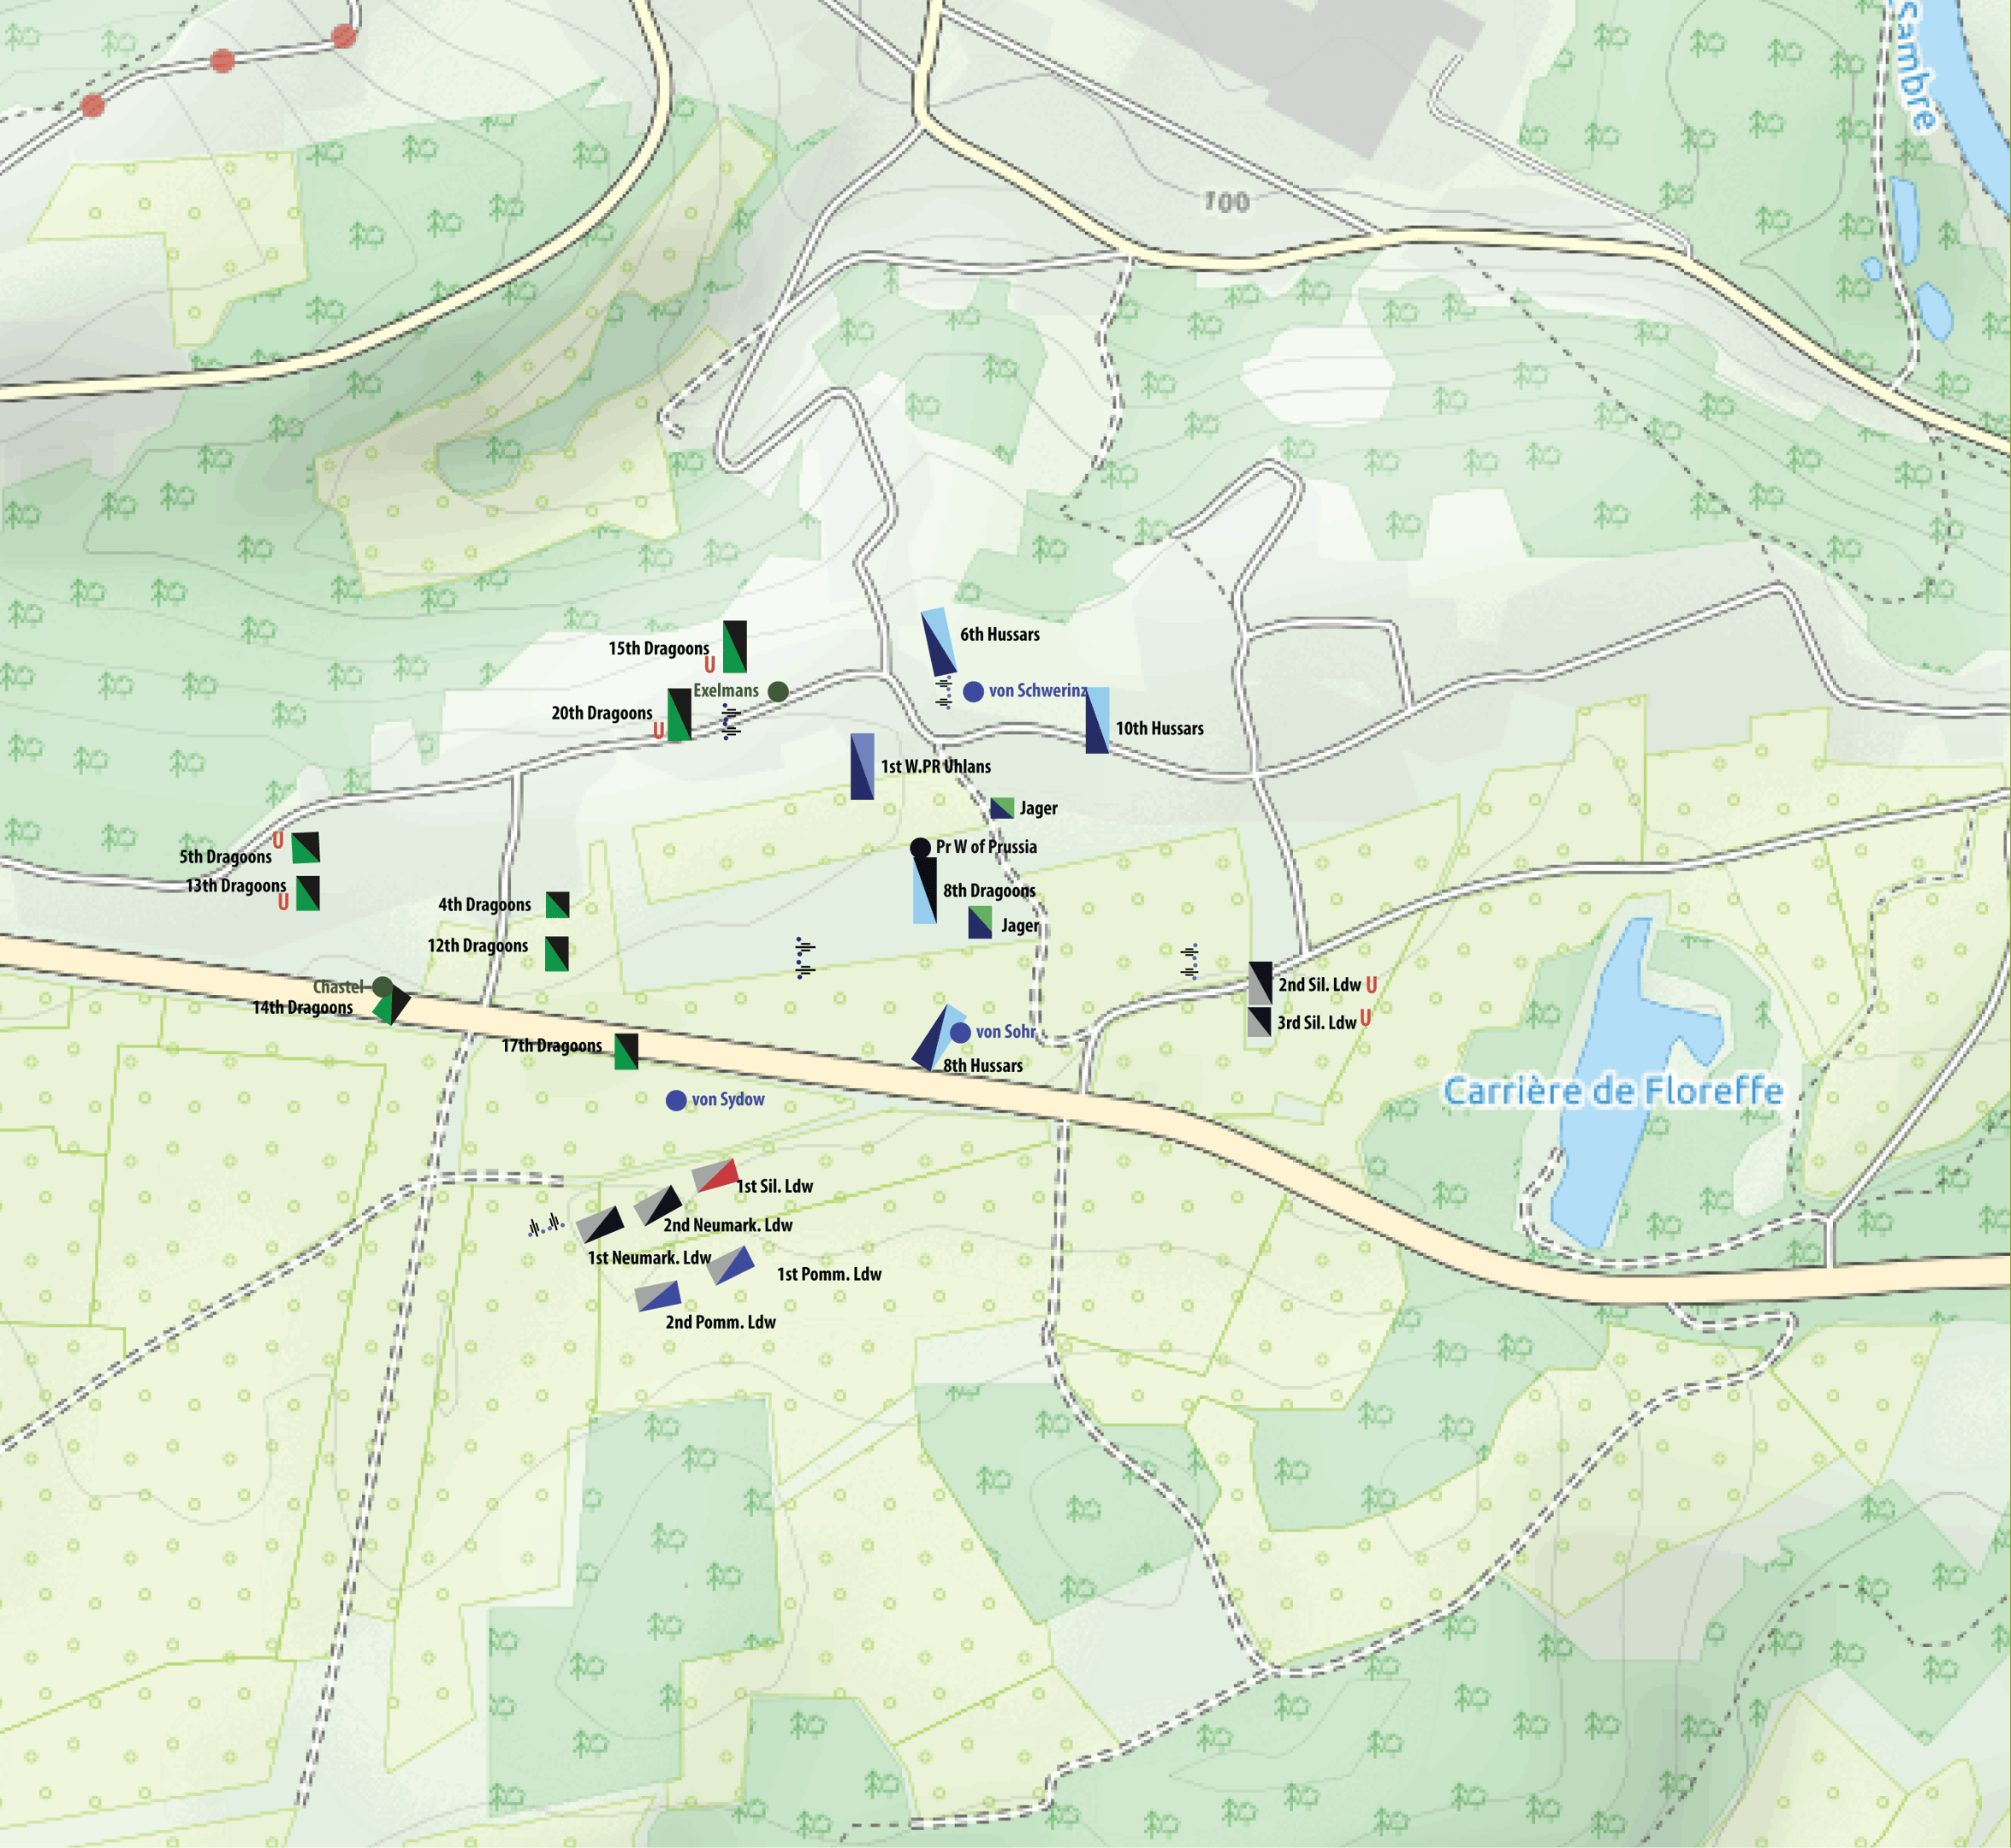
Turn 3. Strategic Manoeuvres: Clash of Dragoons and Hussars
Exelmans decided to attack and drive off the impertinent Prussians. He took the initiative and ordered Strolz to attack with the 15th and 20th Dragoons. They advanced at a steady trot. Von Schwerin ordered the 6th and 10th Hussars to counter the attack; bugles broke the peace of the day, and without hesitation, the two regiments moved out, supported by a horse battery and the experienced West Prussian Uhlans. The 20th Dragoons, led by their intrepid Colonel Armand-Francois-Bon-Claude de Briqueville, known as the man with the long name, broke the Prussian 10th Hussars. The 15th Dragoons were forced to retire by the determined 6th Hussars, led by their brigade general Schwerin. Strolz’s horse was brought down, and Strolz, being trapped beneath his mount, was compelled to surrender to a captain.

Turn 4. Decisive Moments: Strolz's Surrender Shifts the Tide
Exelmans decided to attack and drive off the impertinent Prussians. He took the initiative and ordered Strolz to attack with 15th and 20th Dragoons. They advanced at a steady trot. Von Schwerin ordered the 6th and 10th Hussars to counter the attack; bugles broke the peace of the day, and without hesitation, the two regiments moved out, supported by a horse battery and the experienced West Prussian Uhlans. The 20th Dragoons, led by their intrepid Colonel Armand-Francois-Bon-Claude de Briqueville, known as the man with the long name, broke the Prussian 10th Hussars. The 15th Dragoons were forced to retire by the determined 6th Hussars led by their brigade general Schwerin. Strolz’s horse was brought down, and Strolz being trapped beneath his mount was compelled to surrender to a captain of 6th Hussars. The defeat of 15th Dragoons allowed a resourceful von Schwerin to quickly turn 6th Hussars towards the 20th Dragoons, whose morale broke at seeing this and retreated to the rear in quick time.
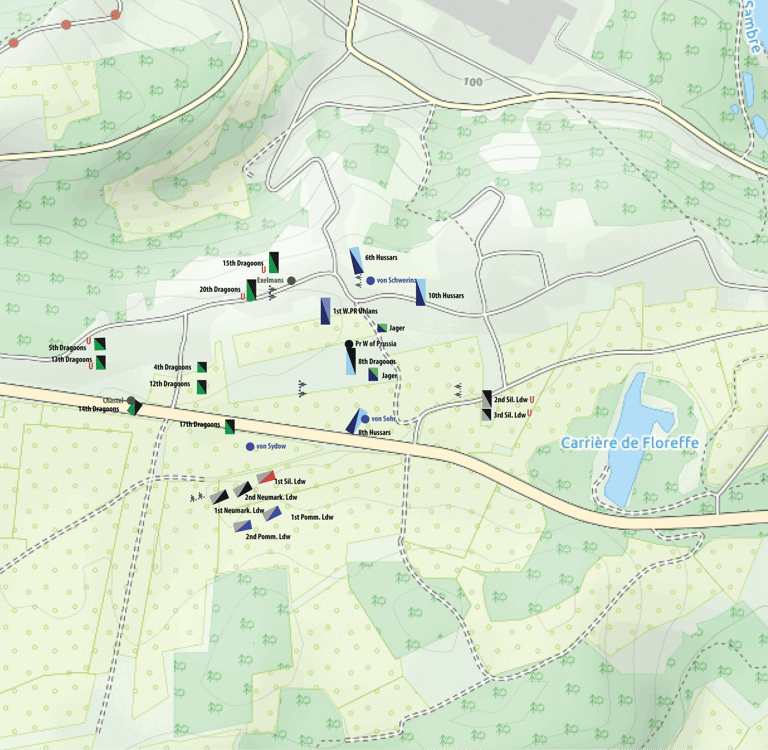
Turn 5. Triumphs and Retreats: The Unravelling Battle
The 6th Hussars, elated by their success but slightly disordered, drove down on weak 5th Dragoons. Undaunted, Colonel Jean-Baptiste-Antoine Canevas Saint-Amand, known as the man with the longer name, thundered into the 6th Hussars and forced them to retreat. The 13th Dragoons managed to face the threat of 6th Hussars but failed to support their comrades.

Turn 6. Colonel Saint-Amand's Heroic Stand:
A Brave Counterattack
The 6th Hussars, elated by their success but slightly disordered, drove down on weak 5th Dragoons. Undaunted, Colonel Jean-Baptiste-Antoine Canevas Saint-Amand, known as the man with the longer name, thundered into the 6th Hussars and forced them to retreat. The 13th Dragoons managed to face the threat of 6th Hussars but failed to charge in support of their comrades. Strolz’s division was now unsteady, so Exelmans rushed over to take direct command. William brought up von Sohr’s brigade supported on their right flank by 1st West Prussian Uhlans, who were keen to get into the fight and outdo their comrades. Von Sohr opened up with his battery
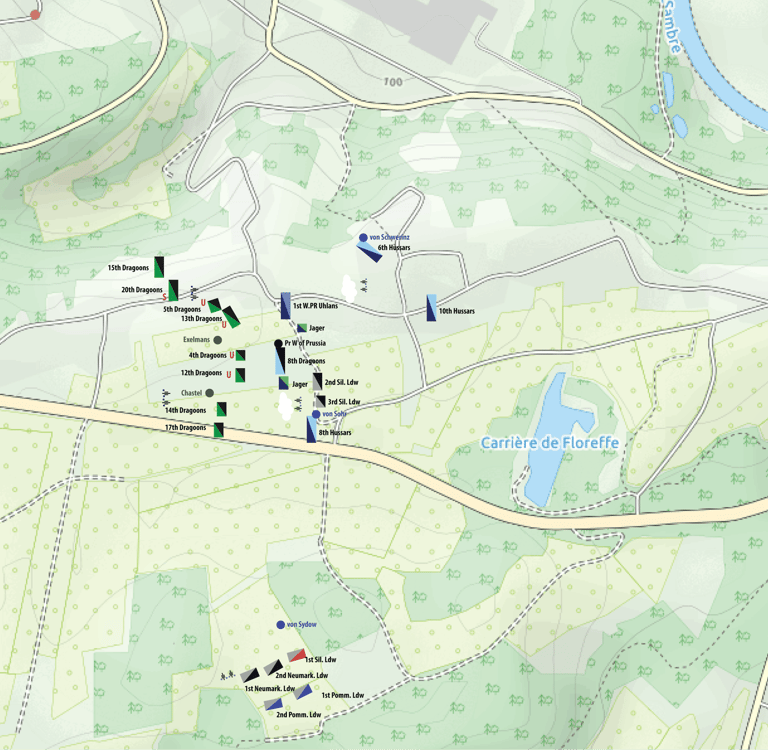
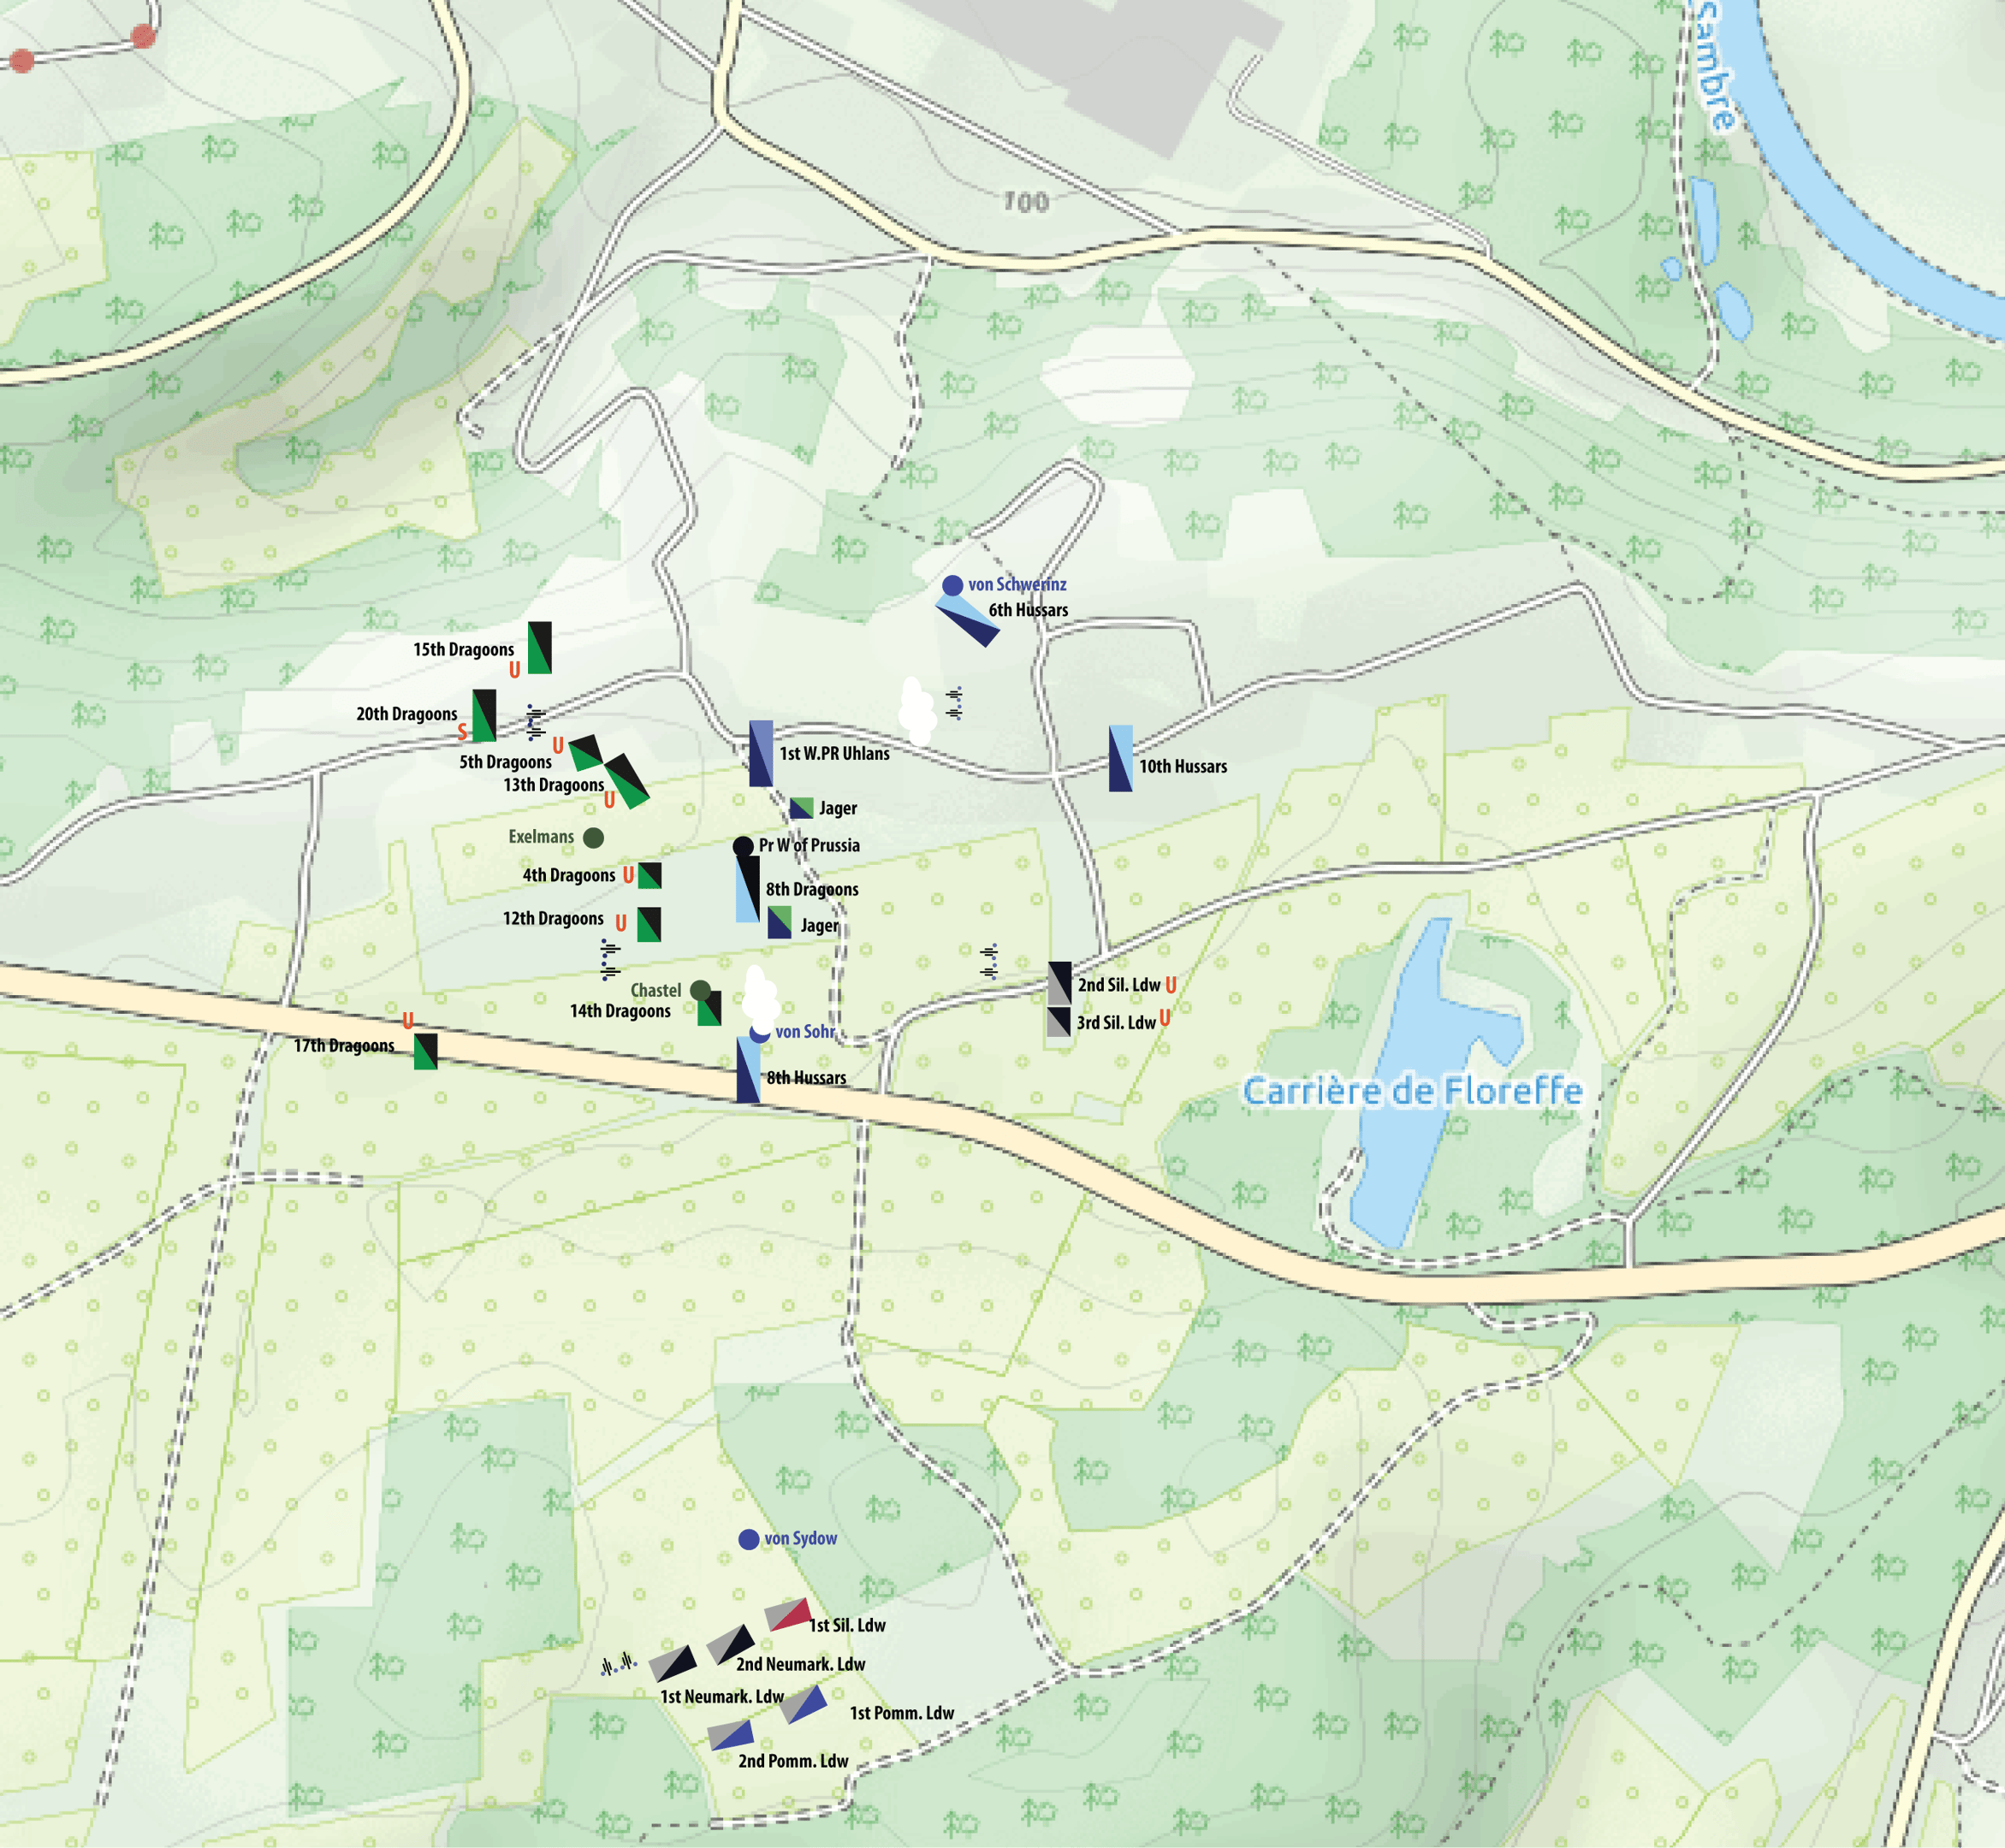
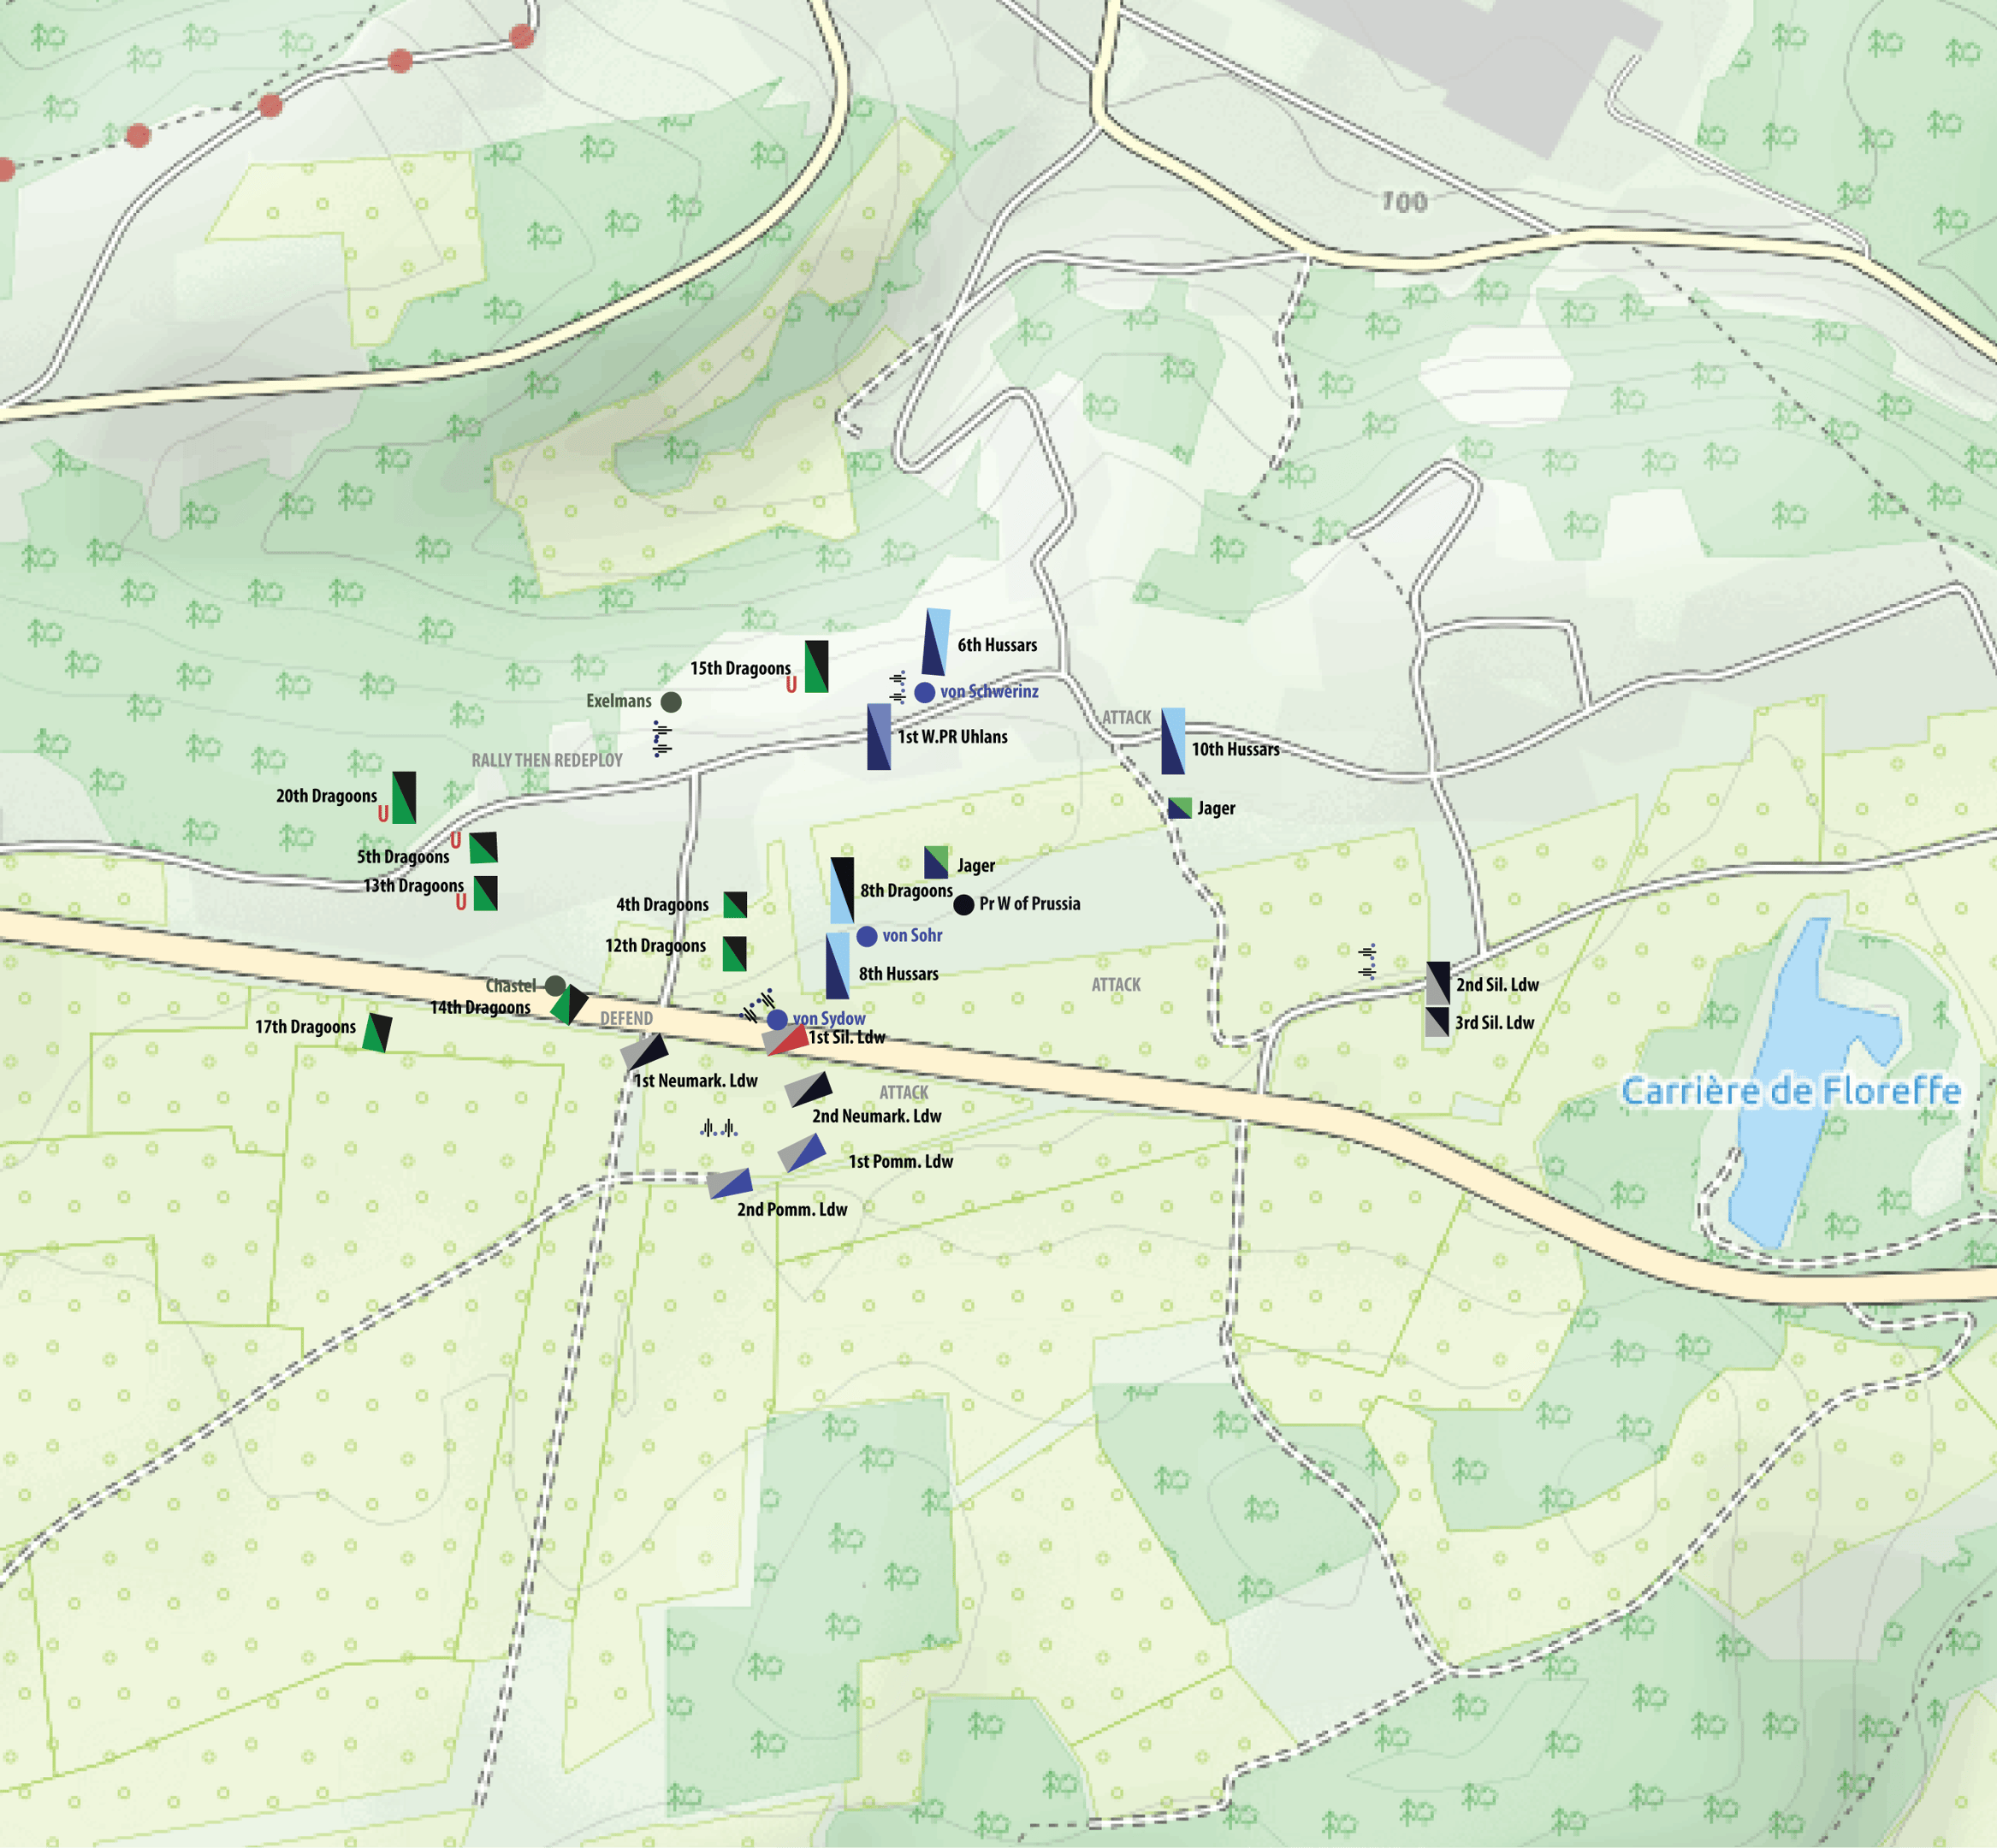
Turn 7. Disarray and Withdrawal: Exelmans' Tactical Retreat
Chastel sent the 14th Dragoons straight at their tormenters who limbered up and darted away. They charged onwards scattering the two regiments of Silesian Landwehr. The 17th Dragoons took heart from this and charged 8th Hussars but the greater numbers of the enemy overlapping them forced them back in total disarray. The French divisions despite their veteran experience were fighting with reduced ranks against stronger units who had the Gods of Luck with them. The loss of the charismatic Strolz was a handicap. His men disheartened. Exelmans ordered a withdrawal in order to redeploy and recover from disorder. The two Prussian brigades needed to recover to some extent too and began to bring units into line again.
Turn 8. Von Sydow's Bold Charge: Prussian Initiative Prevails
Von Sydow had a rush of adrenaline and launched his brigade at the tired, retiring, and reforming French dragoons. Would these less than intrepid warriors of Prussia actually charge? Von Sydow and his staff led way out in front to encourage his men. The Silesian landwehr licked their wounds and tried to rally. Everyone else was drawing breath. Taking the initiative Von Sydow’s horse battery rushed into a position on the flank of Chastel’s command and opened fire on his horse battery causing some damage. Von Sydow excelled himself; he attached himself to 1st Silesian Landwehr and along with 1st Neumark landwehr and charged into 17th Dragoons just managing to win the fight despite having superior numbers and charging the flank. The brave but unlucky dragoons were driven off.
Turn 9. The Final Push:
Weakened Units and Strategic Withdrawal
The 1st Silesian’s trotted into the French horse battery, which failed to react in time and overran. Caught while trying to reform Exelman’s divisions and couldn’t recover. He was forced to order a retreat, hoping to find a new position later to recover and reform. Chastel’s already weak division was mauled and is now the strength of a regiment. Strolz’s division lost its leader and a quarter of its strength. The Prussians came off lightly, but the Silesian Landwehr was weakened. Some bad luck and weakened units were up against stronger units. If Exelmans had been up against any other commander than Prince William, he may well have prevailed. Von Sydow’s command got lucky at the end; the Prussian’s had the initiative at the right moment, even though the Landwehr cavalry only had enough morale to charge. Another ‘if,’ if Strolz’s command had defeated the regular Prussian units and he himself had not put out the picture at a critical moment, it is doubtful the Prussians would have prevailed.
Turns 10 to 11. Reforming Forces:
Prince William's Post-Battle Strategy
Prince William began to reform his Corps after the hard fight. He ordered the Mounted Jager to follow the French with the other brigades to shortly follow. Strolz had his sword returned to him after sharing a knackwurst with Prince William and then escorted to Namur to be entertained by the folk there. After short rest his command continued its march towards Charleroi.
This all cavalry affair was a delight to play, and having recorded the action it can be played again as a scenario at a later date.
I have two ways of recording map or tabletop fights is simply using a speech to text app which I will later edit, the other is using the Notes app on my iPad in which I can add pictures for each turn. A quick edit and I have another recorded scenario. My main rule is, don’t work hard.

