Shenanigans in the Shenandoah: Franklin
In 2023, one of our regular wargaming group proposed a new campaign based loosely on Real Time Wargame’s ’Stonewall Jackon’s Shenandoah Valley Campaign‘ excellent campaign system. So let me give you a brief overview of the campaign and a detailed look at our first major encounter at Franklin.
AMERICAN CIVIL WAR
Richard Bird
1/4/202411 min read

A Quick reminder of the Historical Campaign Background
The Shenandoah Valley Campaign led by General Thomas "Stonewall" Jackson during the spring and early summer of 1862 emerged as a crucial military operation in the context of the American Civil War. Although the forces engaged were considerably smaller compared to those in the simultaneous Richmond campaign, Jackson's proactive strategy had a significant impact. This strategic approach significantly impeded the Union's pivotal offensive towards the Confederate capital, ultimately preventing General George McClellan's Army of the Potomac from achieving victory and ensuring the survival of the Confederate cause.
Pete, who umpires and runs the campaign uses the campaign section of ‘Jackson in the Shenandaoh Valley’ by Real Time Wargames, but the tabletop rules are the time honoured Fire and Fury rules with minor modifications. If you haven’t yet come across Real Time Wargames,, give yourself a treat and check out their site. Their campaign rulebooks take all the heavy lifting from setting up a wargames campaign. More on this in another post.
It is not the intention of this article to go into the detailed moves of the campaign because the moves are co-ordinated by our esteemed umpire and games master, Pete, who controls the moves and reactions of Confederates more or less according to the campaign rules mentioned above.
The Union side is composed of four veteran players – some more veteran than others. Each of us have a division to control independently of the others, and there is but one CinC, General Blenker played by me for the time being, meaning if I should fail in any way during the campaign or I should incur some measure of disobedience and unhappiness with my orders or my ability to command, the other players can whinge to my superiors and my political puppeteers and replace me. I can complain in return but the final arbiter is again, Pete.
There is more, but for now I must introduce my fellow generals. Justin is General Banks; Alan is General Shields and Howard is General Fremont. We also have two further non-player divisions of Schenk and Kelly whom any general can incorporate into their own command if allowed.
Although I know where my generals start in the campaign, once given orders I have scant information as to where they actually are. Fog of War,cnaughty generals and Rebel insurgents plague my cunning plans from the beginning. I had issued orders for General Fremont to advance southwards to wards towards Franklin but it did take a while for it to happen as Fremont had other ideas and his own concerns.of which I had no knowledge. Arriving at Franklin Fremont came under attack from Jackson’s well trained command. The battle of Franklin is about to begin.
To Battle: Fremont advances reluctantly and retreats with zeal
The first battle finds General Fremont being attacked by Jackson’s forces at a town called Franklin. Fremont has advanced cautiously and on receiving reports from scouts has taken up positions close to the town.
The Orders of Battle and Figures used
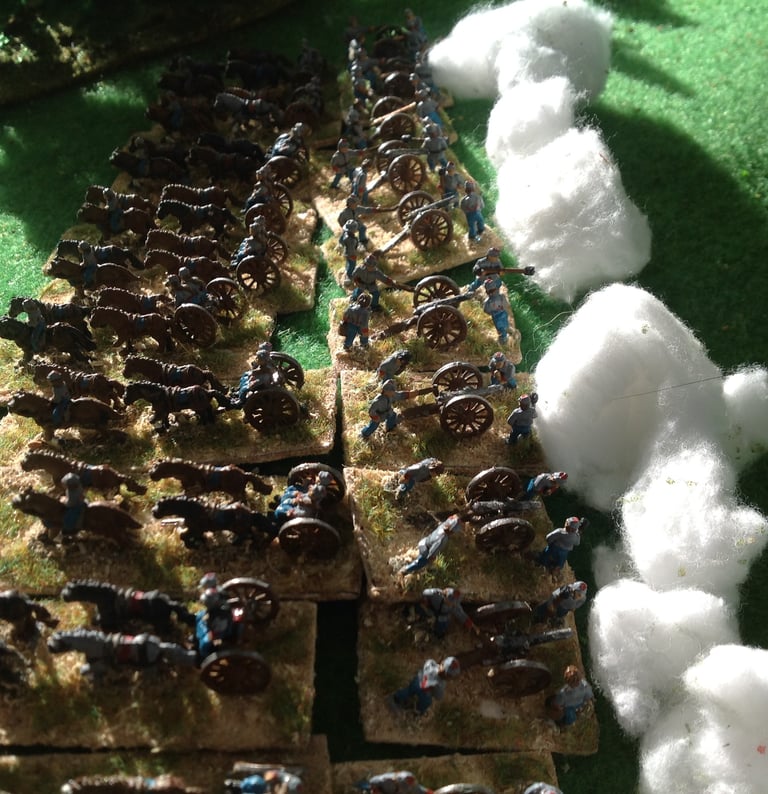
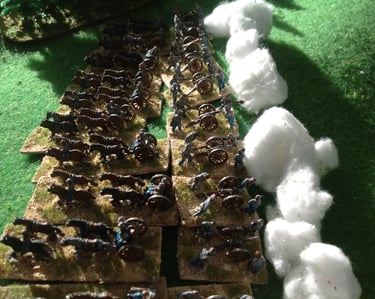
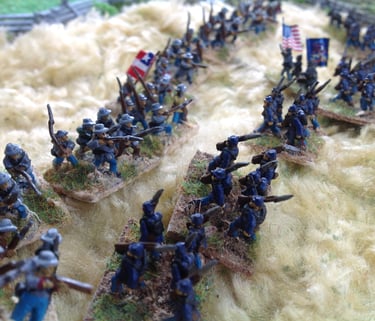
Overall the Confederates have a marked advantage in quality of troops and numbers but this is offset somewhat by the defensive positions that the Union general has chosen. We played the campaign entirely in 10mm figures from Pendraken on a 121ft x 6ft table. The scale gave us the ‘look and feel’ we were after, with plenty of leeway to manoeuvre despite being played lengthways on the table. The Union commander, Fremont had chosen his position well. We’ll see how that plays out shortl
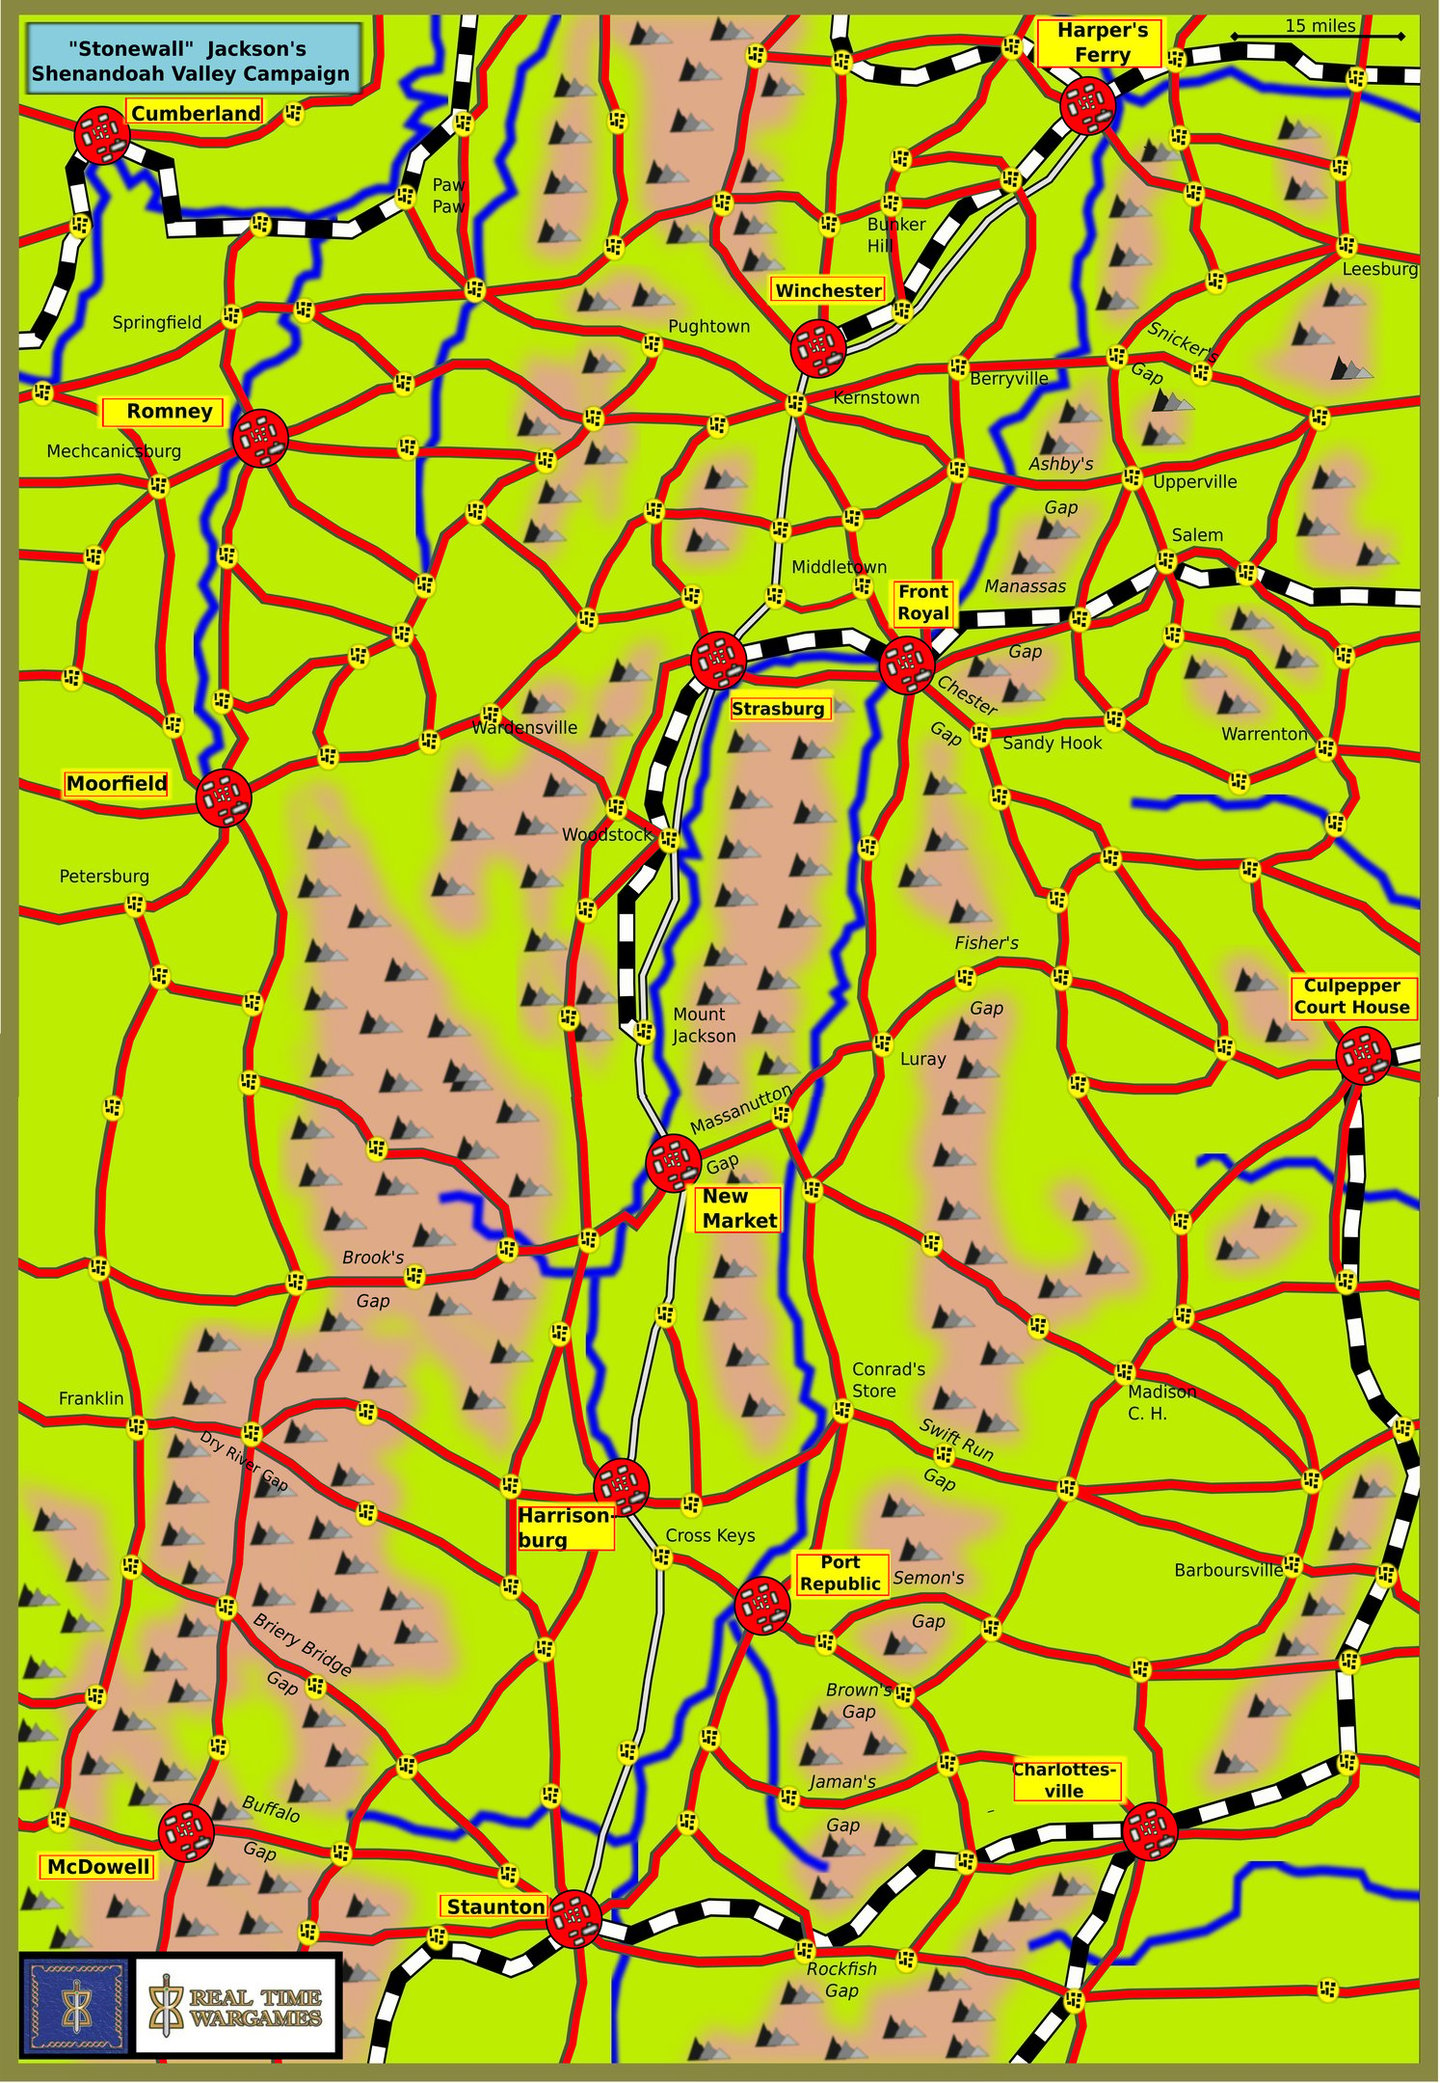
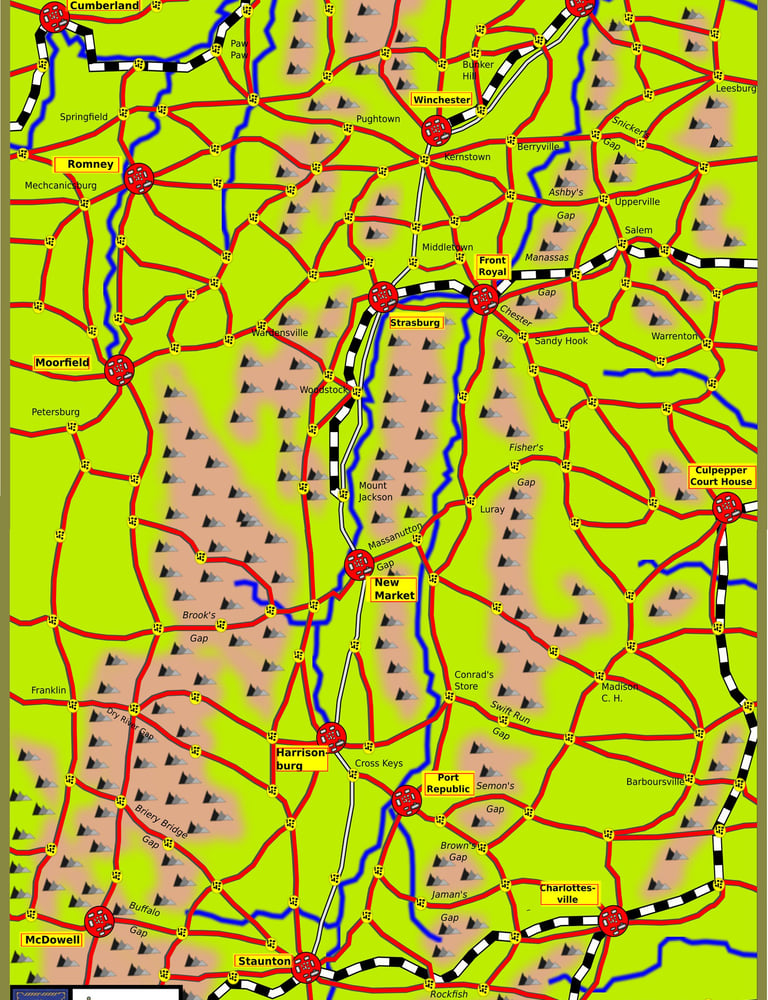
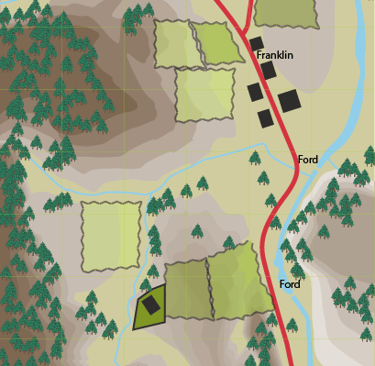
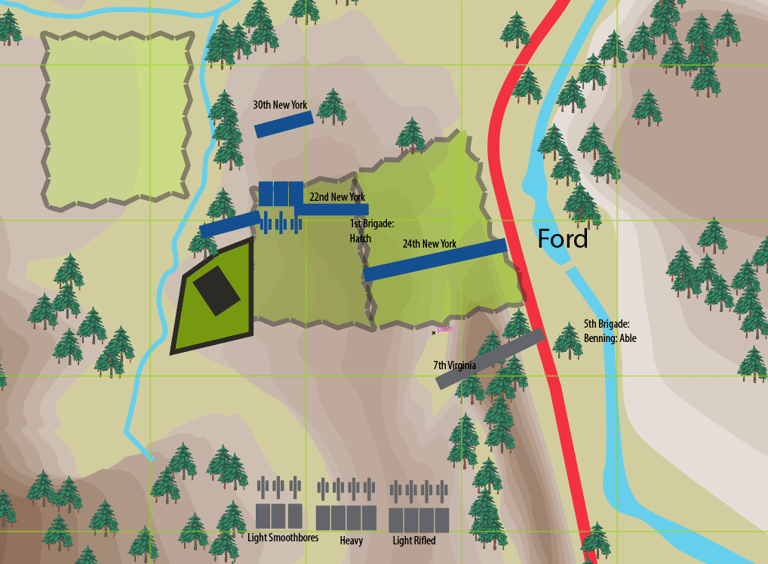
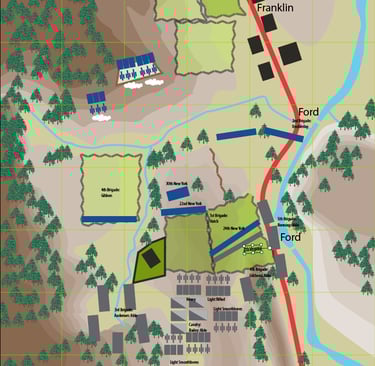
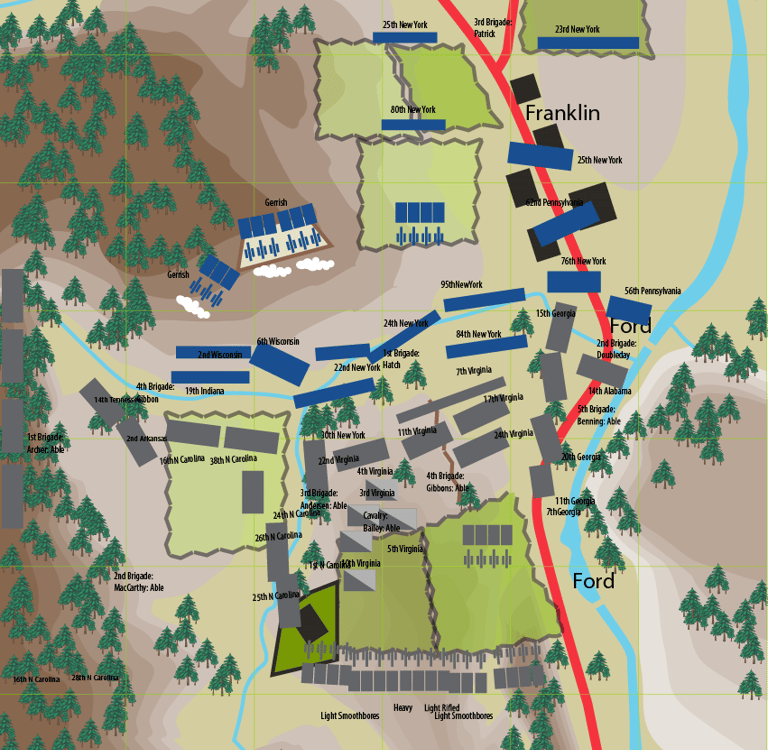
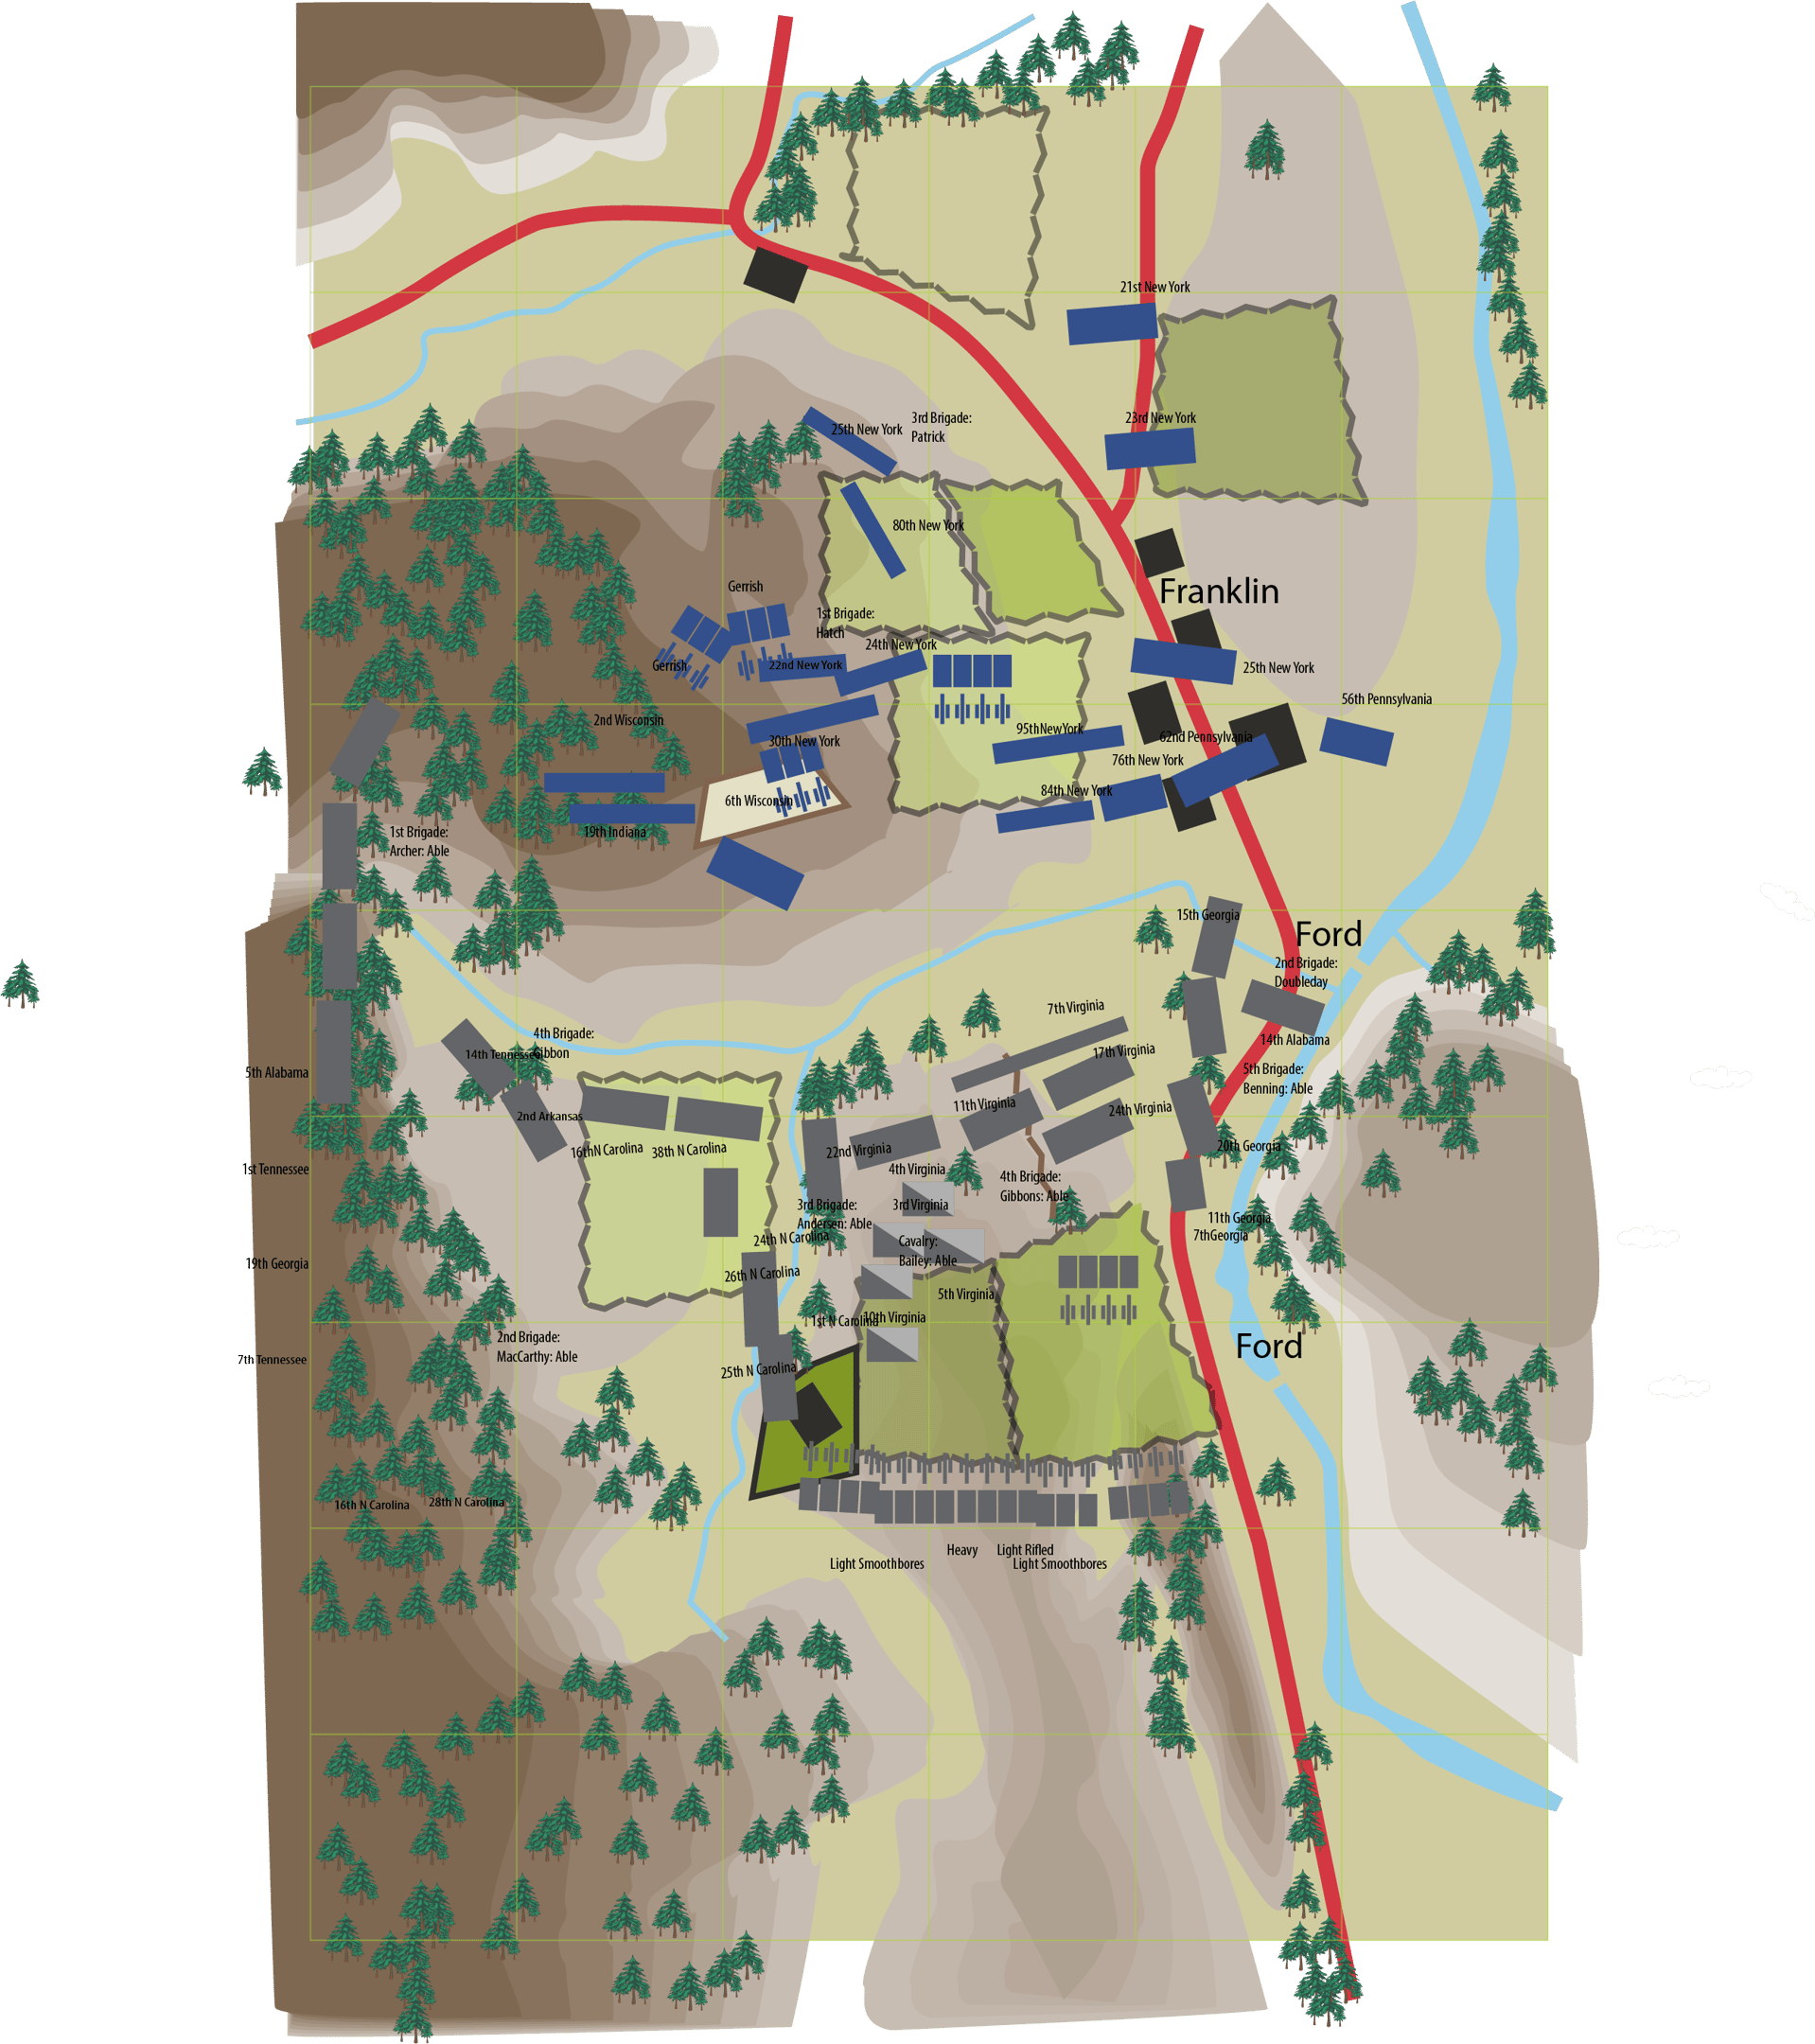
Above is the map from Real Time Wargames that comes with the rules., used by us in the campaign
Real Time Wargame rules
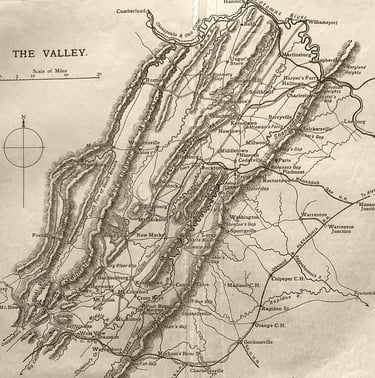
A historic map of the Shenandoah Valley
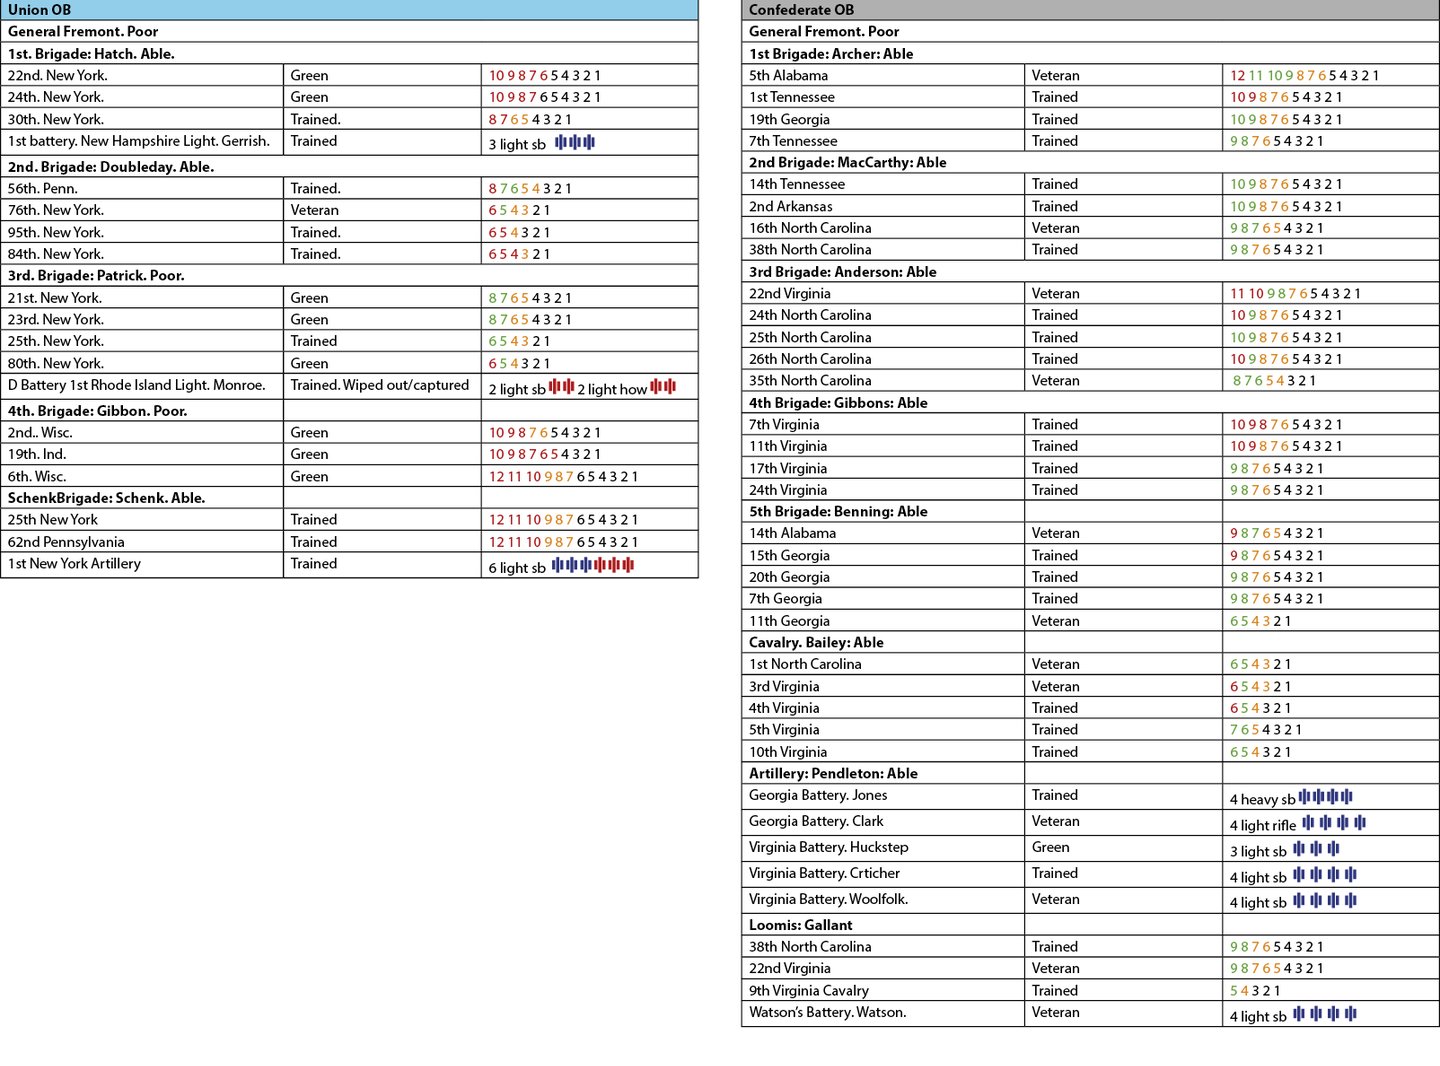
Those who have played Fire and Fury will recognise the troop training and the number of bases per unit. The colours represent their combat status, Green-Fresh, Orange-Worn and Black-Spent. Red indicates casualties by base.
The Battle
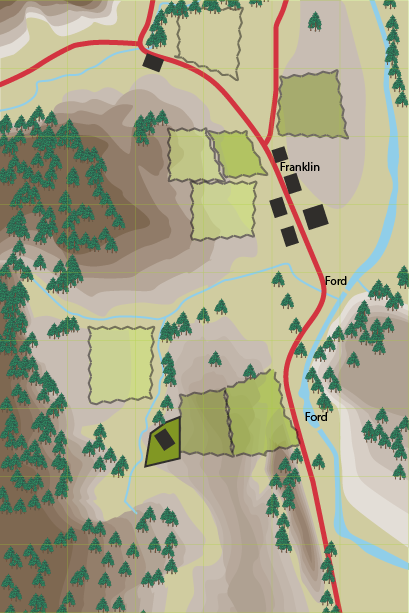
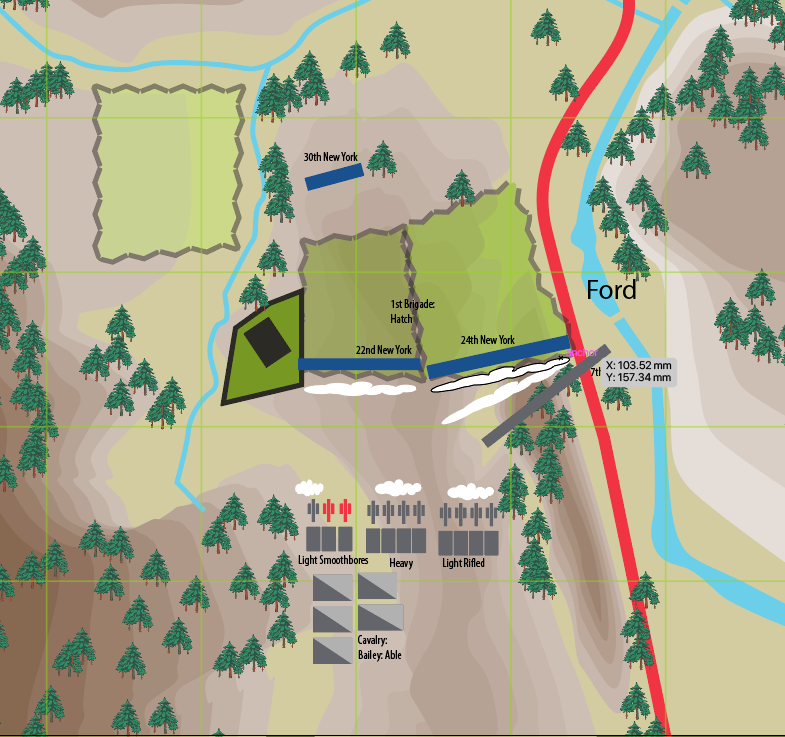
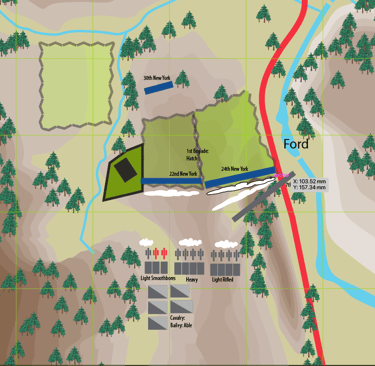
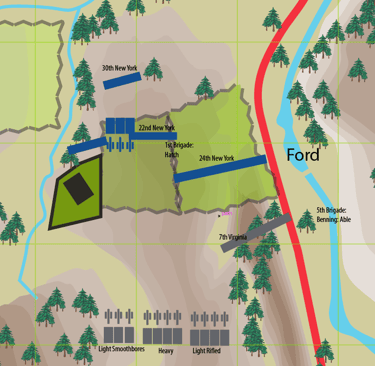
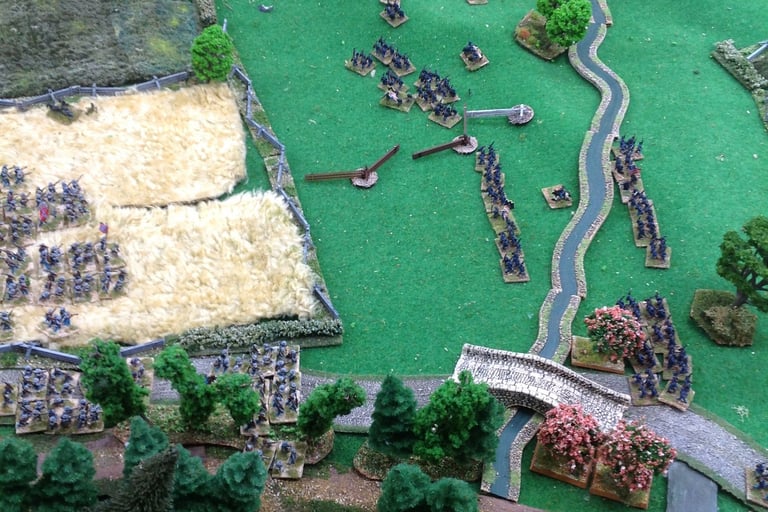
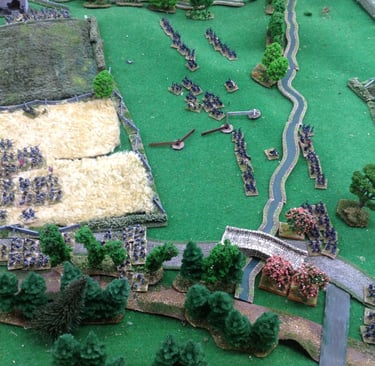
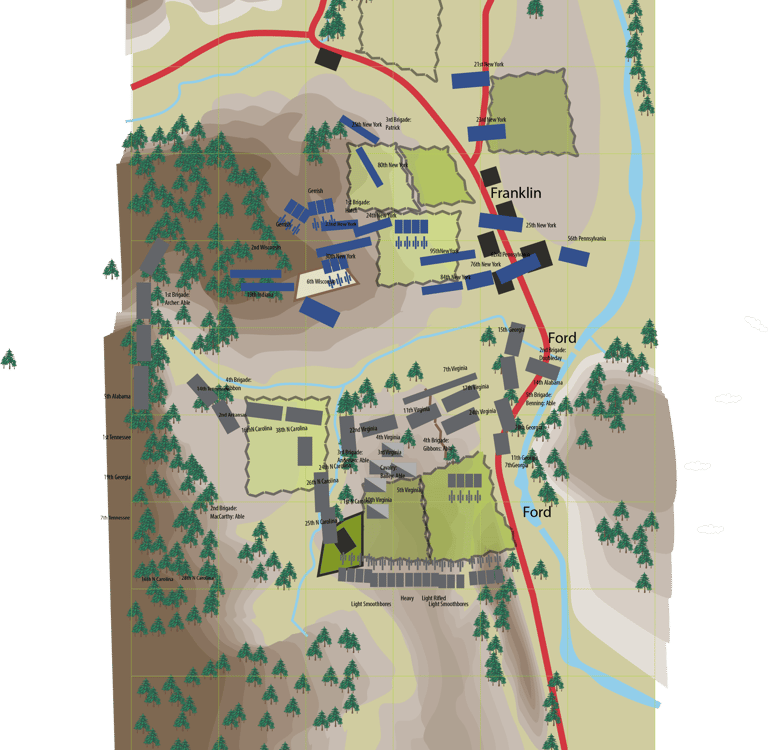
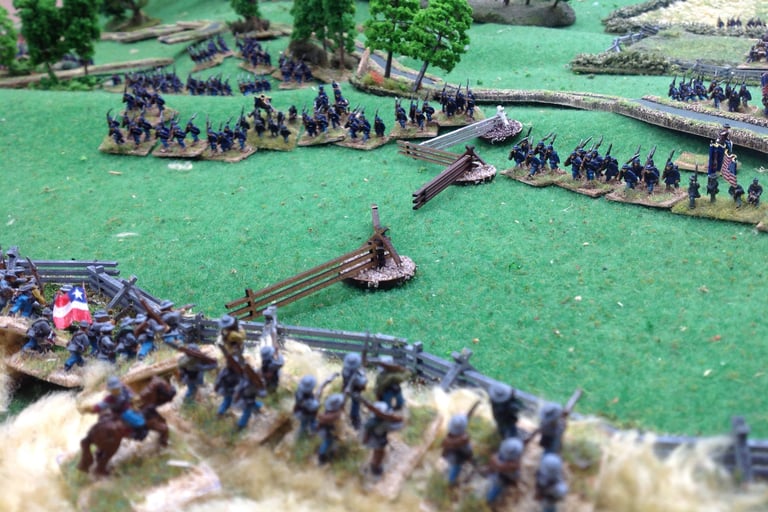
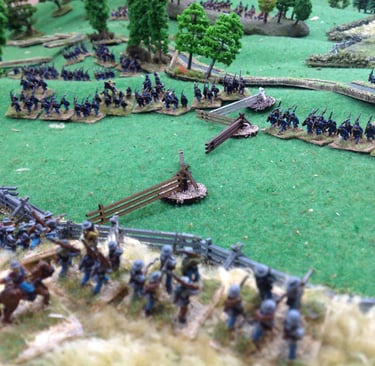
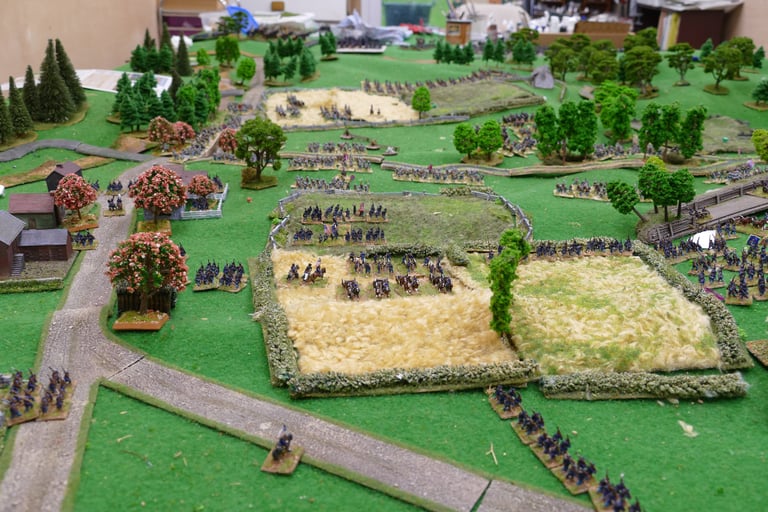
The map below shows the terrain over which the two sides will fight. The Union are defending the area adjacent to the Ford at the lower end of the map and can deploy anywhere north of that position. The Confederates will be coming up from the south. The wooded high ground on the left was steep and rough culminating in the large hill at the top of the map where the Union placed a redoubt for their artillery. The rules were Fire and Fury Regimental with a couple of house rules added.
Turn 1: Confederates
In the early morning Union piquets of 1st Brigade under Hatch were falling back towards their line which was deployed behind snake fences and the wall of farm (see map below). They gave the alarm. The Rebs were advancing through the gap between the road and the woods onto the high ground. The Confederates were already aware of the Union brigade under Hatch posted near the ford. They advanced some batteries in order to pound the union positions.
The two Union infantry units fire at long range on the Confederate batteries who are unlimbering. A gun section is silenced.
The Rebel guns have moved and unlimbered so cannot fire in this offensive fire phase.
Turn 1: Union
The rest of the Union manoeuvres were hidden from Rebs.
Turn 2: Confederates
The Union 22nd New York fire defensive fire at the Confederate batteries and silence another section of the smoothbores.
The 24th New York fires at the 7th Virginia who in extended line appear at the woods edge near the road but fail to do any damage.
In offensive fire the rebel heavy battery along with the unsilenced smoothbores pound the 22nd New York, a 9 is thrown +4 (19 points firing) = 13 but -2 cover gives an 11= Withering Fire, two bases lost and disordered. The unit is now Worn. Not good for the Green Yanks.
A rifled battery fires...badly but is enough to disorder the Green troops of 24th New York.
The 7th Virginia fire at 24th NY but only get a disorder, but the New Yorkers are already disordered.
Turn 2: Union
Following standing orders whereby, as soon as he comes under fire he is to retire, Hatch instructs his frontline units to fall back.
The 24th New York get a Tardy move but Wavering which means they remain disordered. The 22nd falls back on supports.
Turn 3: Confederates
The heavy smoothbores and the light rifled battery limber and move to the hedge line which has just been vacated by the boys in blue.
The silenced guns of the smoothbore battery rally silenced guns and limber in position.
Anderson’s 3rd Brigade emerges from the woods on the left adjacent to the battery and advances.
The 5th Brigade under Bennington brigade advances up the road adjacent to the river. The 7th Virginia are ordered to charge with cold steel.
Union defensive fire. The six guns in the redoubt on the hill in the rear fire long range at the rebel heavy battery silencing one section.
The smoothbore battery on the rear hills fire at the emerging 3rd Brigade disordering the rebel unit approaching the farm. No responsive firing from the Rebs.
The disordered 24th New York fire on the charging 7th Virginia, a Galling Fire but fail to stop the Virginians who are now disordered.
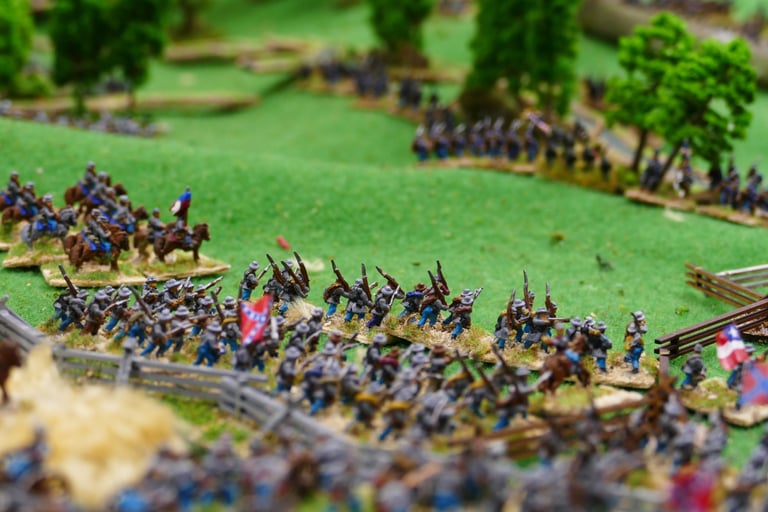
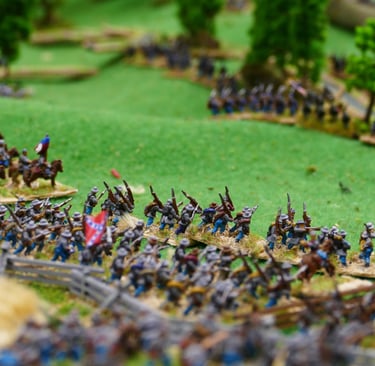
The 7th Virginia close on the New Yorkers. The Rebs have a +2 advantage and throw 7. The New Yorkers throw 5, 4 difference so are forced to retreat disordered 2ins and losing a stand
Turn 3: Union
The 22nd New York line the rail fenced field in alignment with Gibbon’s 4th Brigade on their right flank. The 24th New York is pulled back by Hatch.
Confederate defensive fire. 7th Virginia fire a disorganised volley at the retreating 24th New York who lose another stand.
The rebel gun line target the 22nd New York. 9 is thrown +8 and -2 for cover and formation =15. Withering Fire. They lose 3 stands and are disordered and Spent.
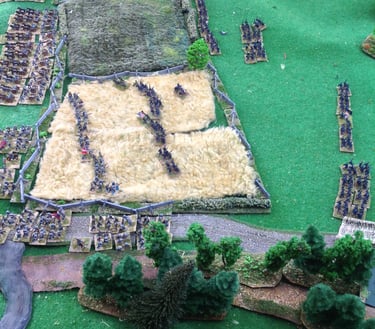
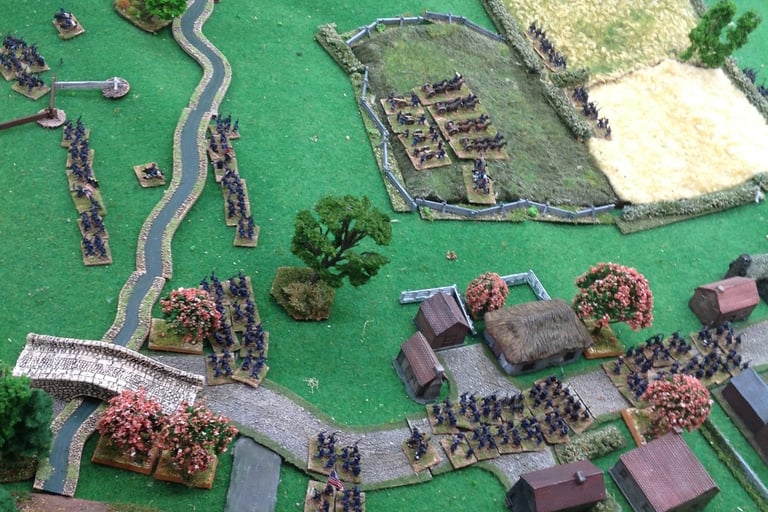
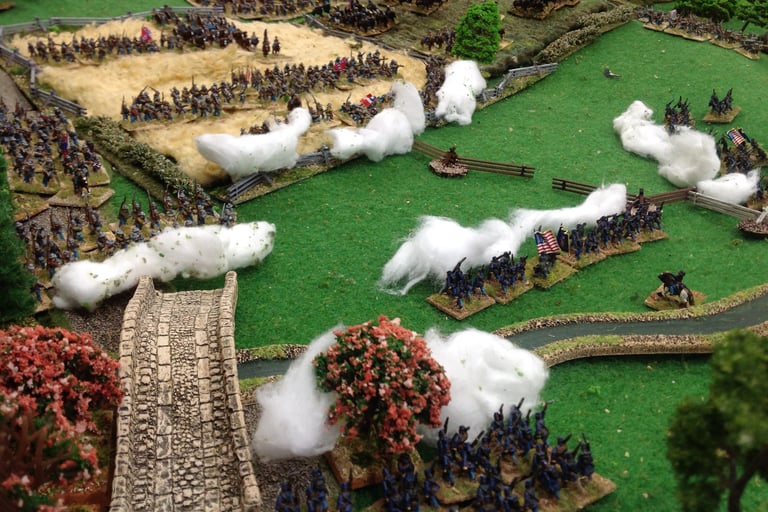
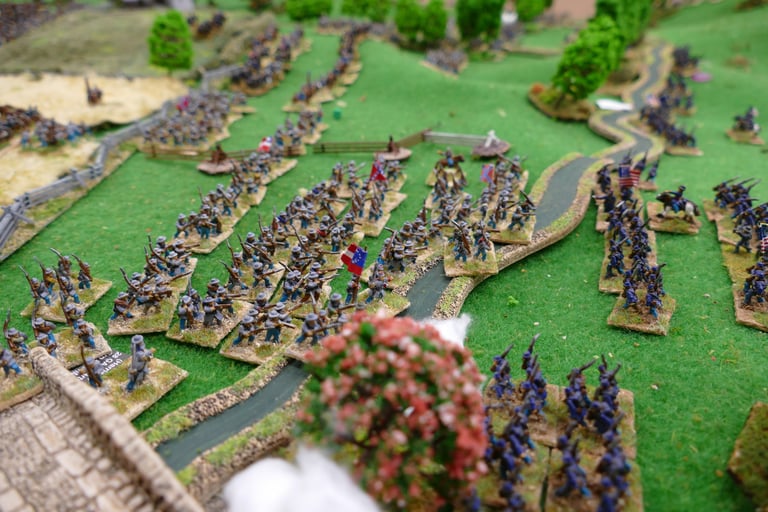
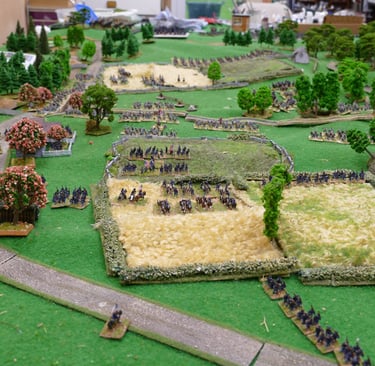
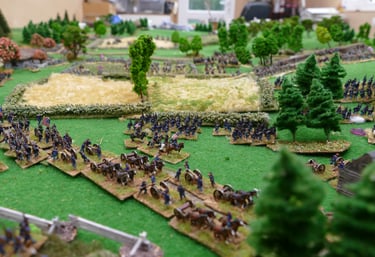
Above: The 7th Virginia charge the 24th New York
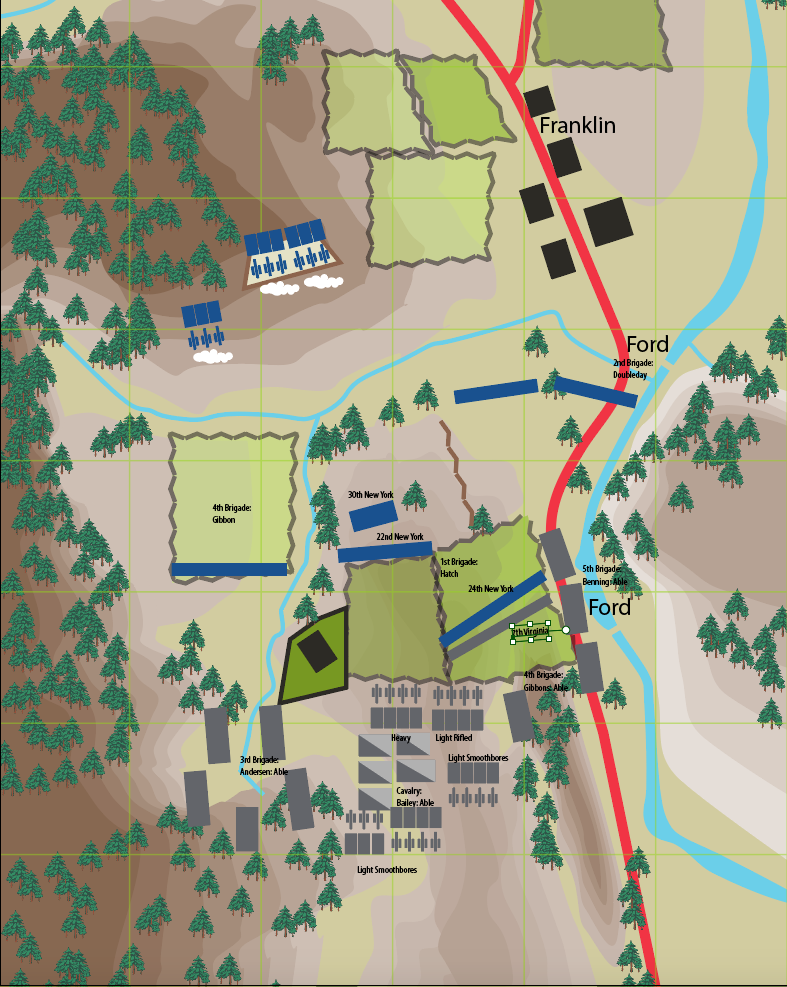
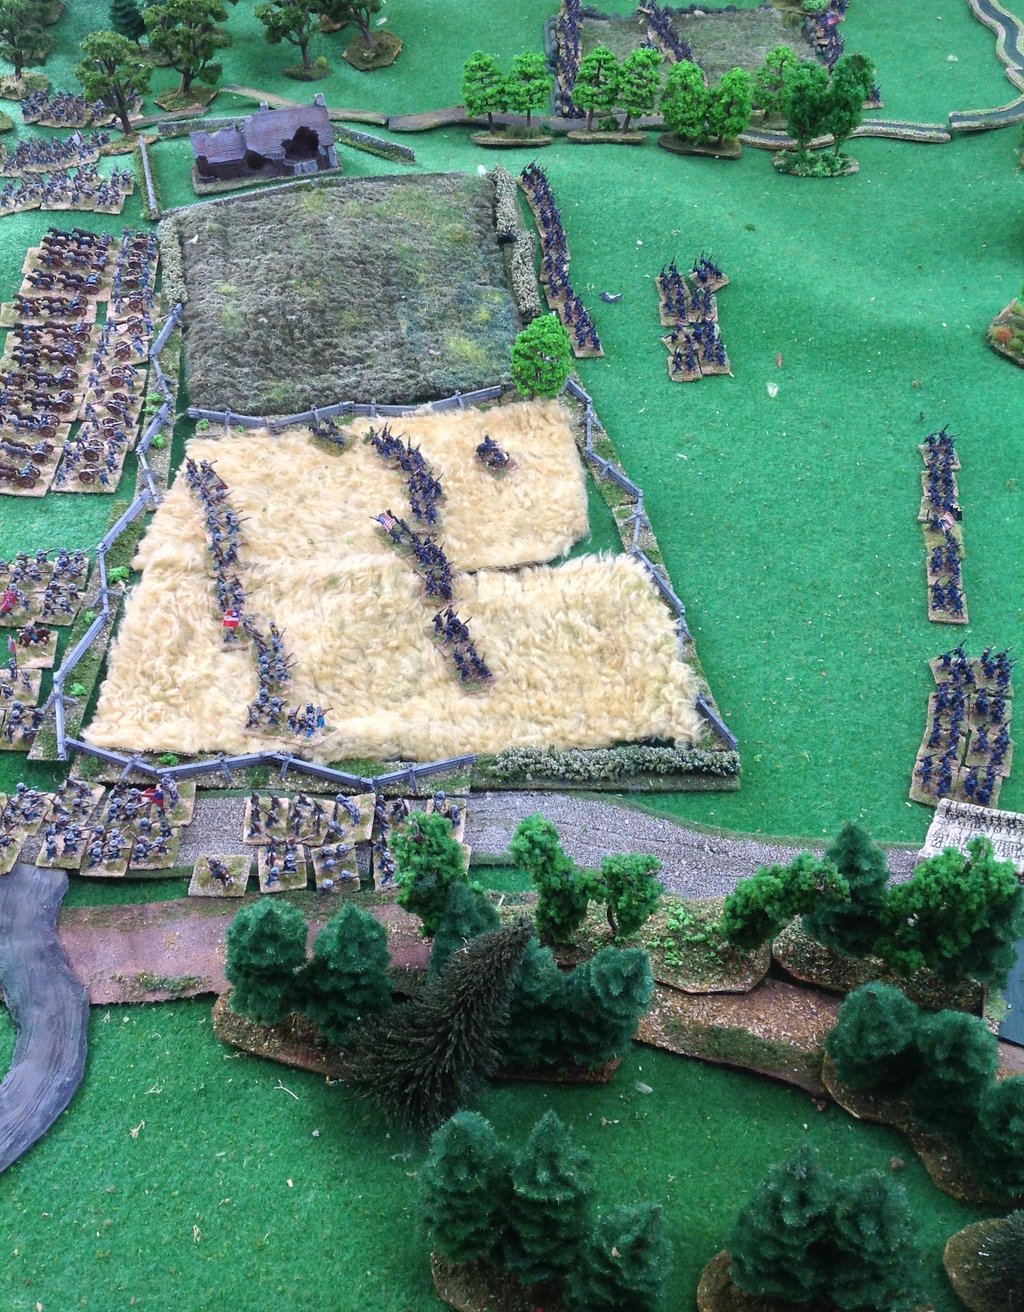
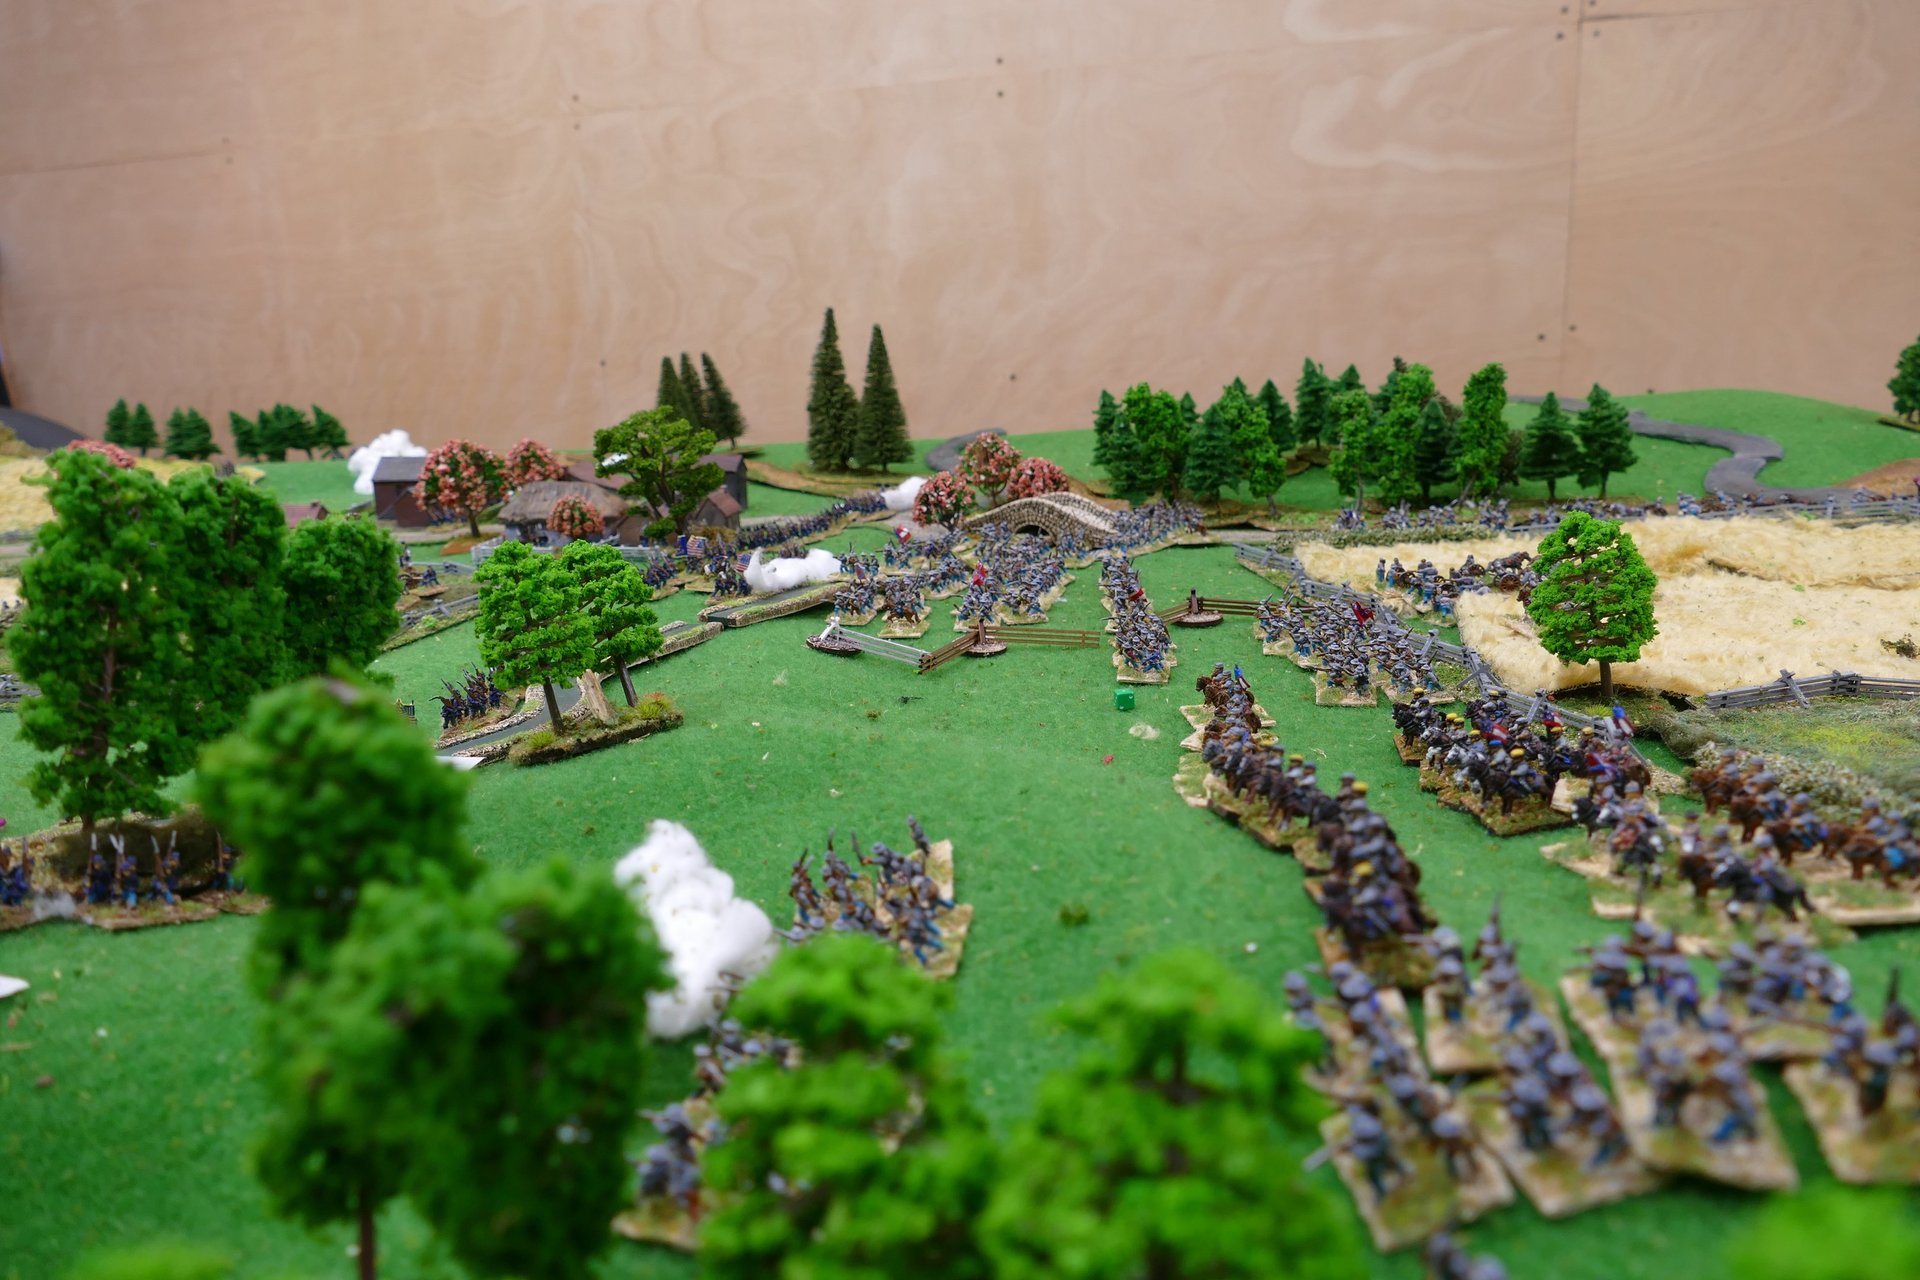
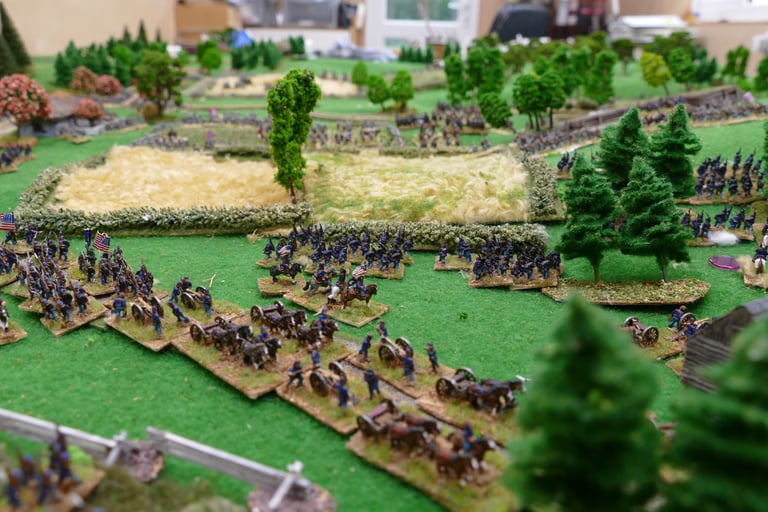
View of Bennington’s Brigade pushing up the road. The 7th Virginia pushing forward after the retreating 24th New York. Top left of the image are Anderson’s Brigade moving up to the farm but Gibbon’s Union Brigade are now revealed in the fields just above the tree line at the top of the picture. Doubleday’s Brigade moves up in support from the right of the picture.
Turn 4: Confederates
On the right, the 5th Brigade advances and the leading unit deploys into line to face Union forces deployed near the bridge.
4th Brigade. Moves forward following up the retreating Union troops.
3rd Brigade move through the farm and advance towards Gibbons men. More guns move into position and cavalry move up in support.
Defensive fire from the Union side. The Schenk battery in the redoubt fail to damage the rebel guns. The smoothbores nearby throw equally as badly with no effect.
22nd New York fire at long range at the rebel gunline. A lively fire.
Offensive fire from Confederates. The massed rebel batteries pound the 30th New York in the middle distance ahead of them causing them to lose a stand and become disordered.
Turn 4: Union
Hatch continues to rally his weary New York regiments behind their supports and Gibbon pulls his first line unit back through his second line to conform with Hatch.
56th Pennsylvania retire behind bridge. Schenk’s infantry takes up new positions.
Defensive fire from the Confederate side. 14th Alabama fire on 56th Pennsylvania, no damage.
The rebels in the woods on the left flank blast off some volleys at 2nd Wisconsin who are disordered and losing a stand.
84th New York suffer disorder and a stand loss from the fire of 7th Virginia.
Offensive fire from the Union. 2nd Wisconsin fire on the Rebels emerging from the woods. No damage.
24th New York get an ineffectual volley off against 7th Virginia.
30th New York disorder 22nd Virginia. Schenk’s battery pound 22nd Virginia who suffer more disorder and a stand lost.
Gerrish’s battery disorder and cause a stand loss on 26th North Carolina.

The Confederates continue their inexorable advance, driving Hatch’s Brigade further back. The Union troops in and around the town prepare to their defence.
Turn 5: Confederates
14th Alabama moves to engage in a firefight with 76th New York, who disorder them and cause a standoff loss.
84th New York engages with 7th Virginia, but 84th gets the worst of it, losing a stand.
Gerrish battery fires ineffectually, but Schenk’s battery in the redoubt causes casualties on the 3rd and 4th Virginia cavalry regiments.
30th New York disorder, 22nd Virginia. 2nd Wisconsin engages in a firefight with 35th North Carolina and 26th NC but loses a stand.
The massed Confederate guns fire on the redoubt, wrecking one gun and silencing another.
Turn 5: Union
The Union moves 2nd Wisconsin through 6th Wisconsin while the 1st and 2nd brigades fall back to the line of the stream.
In the firing phase, there is much ineffectual firing, but Confederate massed batteries wreck another gun section and silence another.
6th Wisconsin received withering fire from three rebel units.
95th New York cause casualties on 7th Virginia as they advance.
The two sides are now divided by the stream which itself is no real obstacle to anyone. The union troops now try to organise themselves in defense of the large hill on their right, the fields in the centre and the town. A pretty fair defensive position which General Fremont feels confident to hold.
The Confederates driven on by Jackson cross the stream at all points and prepare for what they hope to be the final push.
Turn 6: Confederates
The 16th and 38th North Carolina charge 6th Wisconsin driving them back behind supports.
11th Virginia charge past the 7th Virginia to attack 95th New York who stop them in a heap of bodies. Good throw.
15th Georgia of 5th brigade charge 76th New York who fall back hard pressed followed up by the Georgians.
Turn 6: Union
Gibbon falls back in good order. 56th Pennsylvania lose a stand to fire.
The 1st New York battery in the redoubt lose another gun section to the massed battery.
30th New York suffer withering fire from the approaching Confederate infantry.
The New York artillery suffer another wrecked gun section from long range fire from the massed Rebel artillery. It is getting a bit uncomfortable in that redoubt.
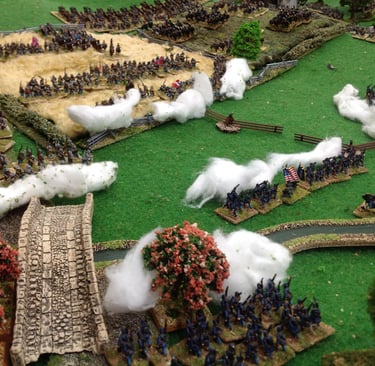
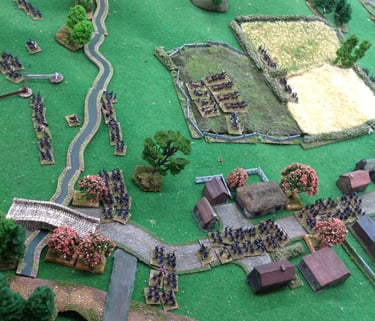
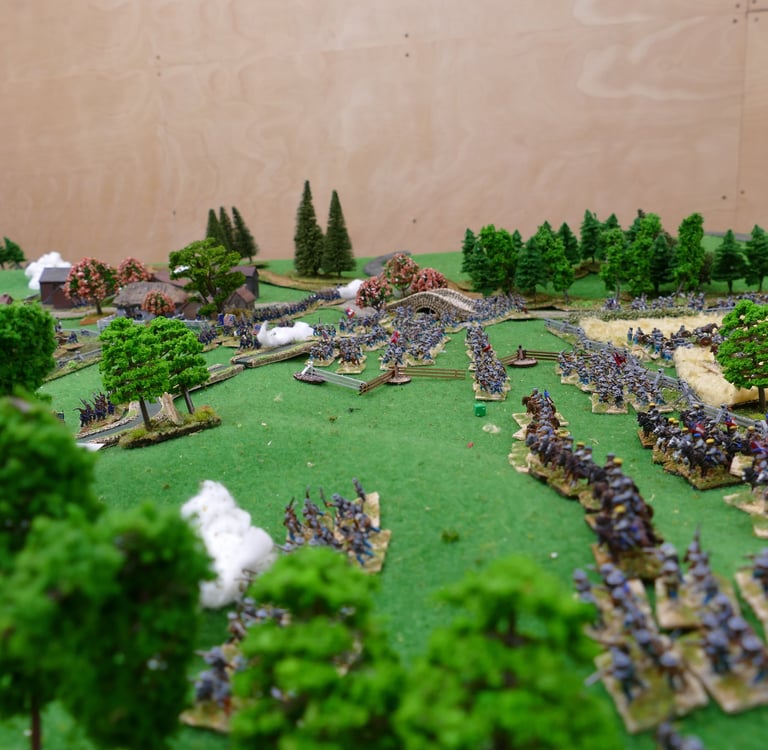
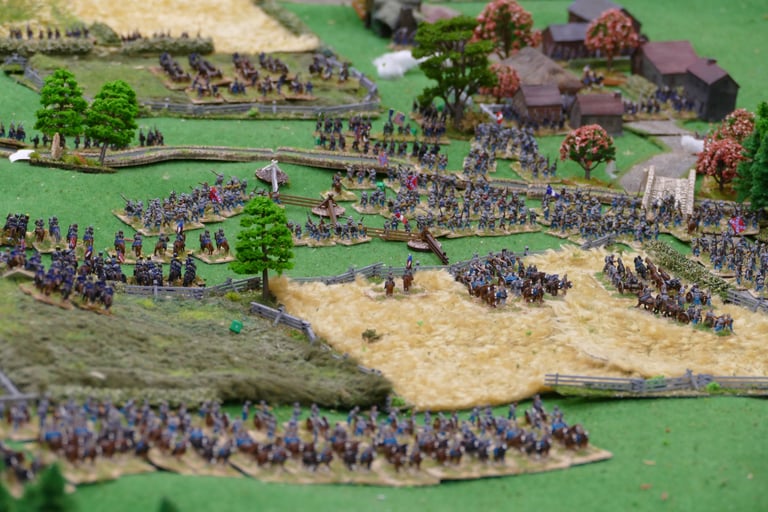
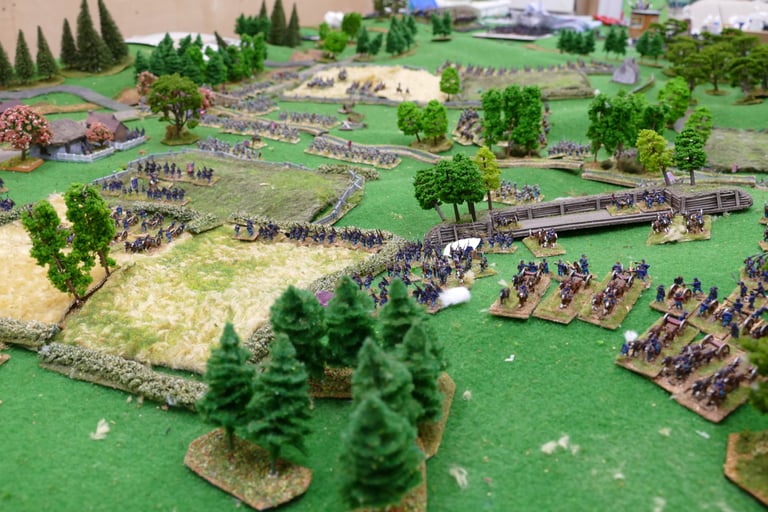
Above: The relentless pressure continues
Turn 7: Confederates
The 16th and 38th North Carolina come under fire from Gibbons men
The 5th Brigade advances to engage with the 76th New York
Turn 7: Union
Seeing that he is gradually being outflanked and pressure is mounting on Franklin and his center, Fremont gives orders for a retreat. Will it be too late? Franklin is still in Union hands, and the Union 2nd Brigade has done well to hold back the tide of rebels so far, but casualties are mounting.
Turn 8: Confederates
The 16th and 38th North Carolina are held back by excellent firing by Gibbons men.
14th Tennesse charge the flank the flank of 19th Indiana throwing them and their supports back up the hill.
15th Georgia of 5th brigade charge 76th New York who fall back hard pressed followed up by the Georgians.
The relentless march through the wooded hills on the Confederate 1st Brigade left flank is making progress at last, but have been spotted by Fremont who hastens the retreat.
Turn 8: Union
Fremont is getting edgy. The retreat begins. The Union guns in the redoubt are ordered to pull out as the crumbling front line falls back towards the supporting 3rd brigade to the rear. The troops in Franklin will stay long enough until their front line has withdrawn to safety. Patrick’s brigade supports to the rear.
The Finale
The game continues for three more moves with a few incidents. The Confederate 1st Brigade has moved too slowly to engage Fremont in the flank, although it was a close call. The rest of the Union division withdrew to lick its wounds. Archer’s flanking Brigade fails to catch the retreating Union infantry who retreat to safety protected by the steady brigade of Patrick.
The Green troops had proved themselves in the face of a larger force of trained and veteran infantry but the cost was heavy. Fremont had achieved his objective of having no brigades rout despite heavy casualties and managed to get his command off the table successfully. Brownie points all round.
A Confederate cavalry brigade had failed to turn up in time in the Union rear. If they had, things would not have been pleasant, for sure.
37 bases and many guns were lost.
The Rebels had lost 16 bases.
In the campaign a percentage of the losses are returned. As Fremont had withdrawn in good order he would have the satisfaction of a higher return of casualties than if he had routed.
In the meantime another gruelling fight is about to be fought on the other side of the valley.
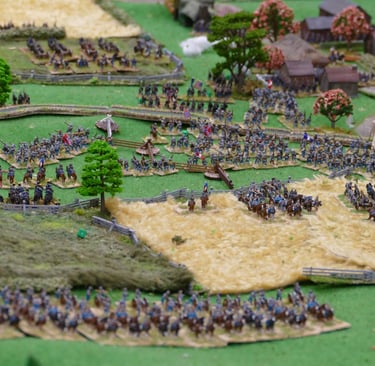
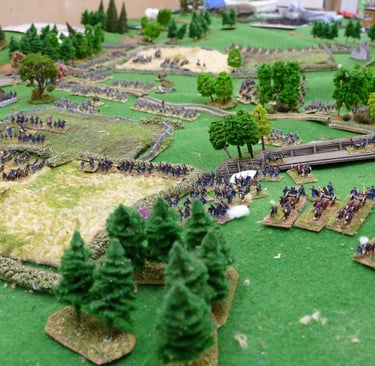
Above: The outflanking move by Archer’s 1st Brigade toward the right flank of the Union position although slow and arduous, has been noticed by Fremont as they came into a clearing in the woods. With little to stop them he is compelled to hasten the retreat before he is cut off.