The actions of Maguilla and Venta del Pozo: comparing French and British cavalry in the Peninsular War
The British campaign in the Peninsula during the early 19th century has been a wellspring of historical narratives. However, a conspicuous gap exists in the literature, particularly in the exploration of the British cavalry's direct confrontations with their French counterparts. This scarcity can be attributed to several factors that cast light on the challenges faced by the British cavalry during this period.
NAPOLEONIC
Richard Bird
2/4/202411 min read
One significant limitation was the scarcity of British cavalry on the Peninsula until 1812. Naturally, their impact on the campaign was constrained by their numerical disadvantage. Additionally, the strategic choices made by Wellington played a role. Cavalry often faced challenges in engaging in battles and campaigns due to the ill-suited terrain, such as the broken terrain at Talavera, the ridge at Bussaco, and the hills around Fuentes de Onoro. Moreover, the French consistently maintained a marked superiority in cavalry strength before 1812, leading Wellington to exercise caution in deploying his limited cavalry formations. A crucial aspect was Wellington's mistrust in his cavalry's ability to execute orders effectively, leading to their deployment only under circumstances where he felt confident in maintaining control.
To evaluate the British cavalry's effectiveness in comparison to their French counterparts, a closer look at specific actions becomes imperative. Two actions in 1812, Maguilla and Venta del Pozo (Villadrago), emerge as critical instances where comparable cavalry types, similar numbers, and neutral ground conditions allow for a fair assessment of commanders, tactics, and trooper capabilities.
Wellington initiated his 1812 campaign with a reasonably adequate cavalry force of about 4000 troopers, combining both heavy and light cavalry. The Maguilla cavalry action unfolded early in the campaign, while the Venta de Pozo engagement took place towards the campaign's conclusion.
Maguilla: June 11th, 1812
The Maguilla cavalry action on June 11th provides a vivid illustration of acknowledged weaknesses in the British cavalry—lack of discipline, control, and effective tactics. With forces on both sides numbering around 700 troopers, the British Heavy Brigade, consisting of 1st Dragoons and 3rd Dragoon Guards, led by Major-General Slade, faced off against the French force under General de Brigade L'Allemand, consisting of the 17th and 27th Dragons, with an attached squadron of Chasseurs a Cheval. The clash followed earlier failed attempts by the French to surprise and defeat an isolated British squadron. Pursuing the retreating French to Maguilla, the British forces engaged in a fierce confrontation after the French dragoons halted and turned to confront their pursuers. The force of the British charge initially broke the French ranks, prompting a pursuit of about 6 miles. However, near the village, the squadron of French chasseurs, about 150 strong, turned the tables on the exhausted and disorganised British forces. After rallying, the French dragoons returned to the fight and turned the tide of the battle, routing the British cavalry, who were severely handled. It took several hours to rally the fugitives.
After the dust had settled on the affair of Maguilla, an indelible mark was left on the British cavalry, with 166 casualties compared to the French's 51. General Slade's leadership was called into question, with anecdotes of his prior actions during the Corunna campaign highlighting concerns about his decision-making. The lack of disciplined tactics and the absence of a formed reserve were evident in the Maguilla debacle. The troopers and officers showcased hot-headedness and a lack of discipline, contributing to the British defeat. Even though the British initially broke with the French, superior French tactics and discipline enabled them to rally and emerge victorious.
It is intriguing to compare the differences in quality of the mounts involved. Both British cavalry regiments rode mounts newly arrived from England, considered among the best heavy cavalry horses in Europe. In stark contrast, the French were on a mix of poor Spanish remounts and exhausted original French horses, battle-hardened under challenging conditions. Despite the initial disadvantage, the French displayed resilience and discipline, rallying swiftly even after being pursued for six miles.
The rearguard actions in the retreat from Burgos
Wellington had finally given up on the siege of Burgos. He was threatened by the advance of forces under Souham, who was marching to cut his line of retreat, which commenced on October 21st.
On October 23rd, Generals Souham and Caffarelli, having advanced from Burgos, led a formidable cavalry force to pursue Wellington's troops. The cavalry consisted of units from the Army of Portugal, including Curto's light horse, Boyer's dragoons, and Colonel Merlin's brigade, totalling 4,300 sabres as of October 15th. The Army of the North contributed the majority of its potent cavalry brigade, led by Laferriere, numbering 1,650. In total, nearly 6,000 veteran horsemen were poised to threaten Wellington's rear.
The rearguard forces comprised Anson's and Bock's brigades, along with Julian Sanchez's lancers, totalling 1,300 British and German dragoons and 1,000 Spanish troops renowned for raids and ambushes but considered unsuitable for a pitched battle. Notably, Ponsonby's dragoons and the regular squadrons of the Galician army were absent, positioned at the front of the column.
To support the cavalry screen, two horse-artillery batteries under Downman and Bull, along with two light battalions, played a crucial role in the unfolding historical engagements.
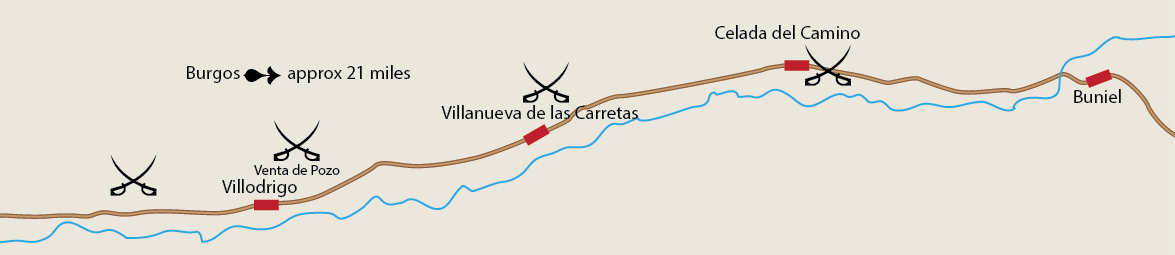
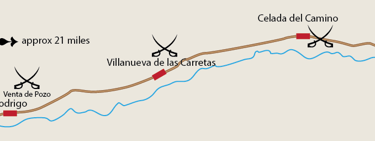
First contacts: Buniel and Cellada del Camino
On the morning of October 23rd in the Peninsular War, the French encountered the British cavalry vedettes near the Villa Buniel bridge, precisely where they had been identified the previous night. The British vedettes, having little strength, withdrew without resistance.
Anson’s brigade, some Spanish horses under Julian Sanchez, and Halkett's two German battalions stood at bay a mile or two east of Celada, holding the line of the Hormaza stream. Anson was in position behind its ravine, with a battalion of the KGL light infantry dispersed along the bushes above the water and the cavalry in support. Sanchez was on the other side of the Arlanzon, which was unaffordable along this stretch of the river. On Anson’s left, on a small rise, was a band of around 300 guerrillas under Marquinez. The ground along the Hormaza was strong, and the infantry fire surprised the enemy, who were stopped for some time.
Stapleton-Cotton handled the rearguard with skill, foiling the French attempts to cross the ravine with partial charges from Anson’s Light Dragoons and holding them at bay for nearly three hours. They eventually continued their retreat after the KGL infantry had retired safely. Over the next six miles or so, the valley widened, which allowed the French cavalry to deploy further out. Anson’s troopers would turn and charge the Chasseurs, who were pressing hard on their heels.


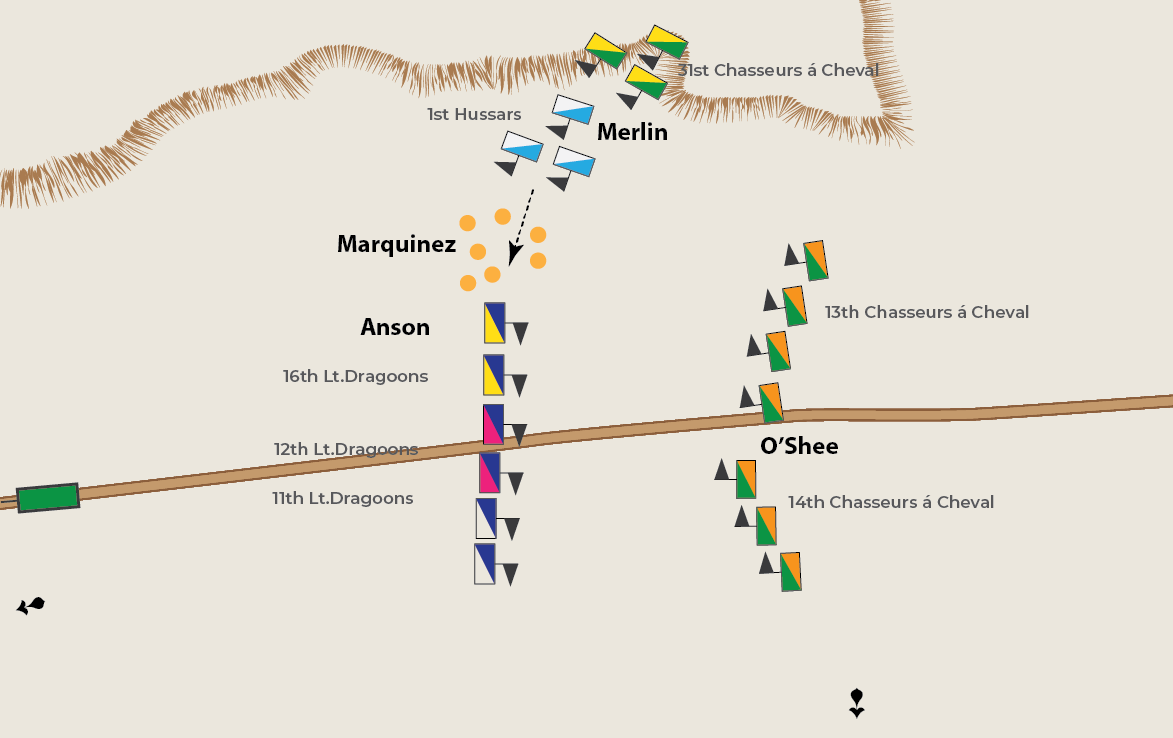
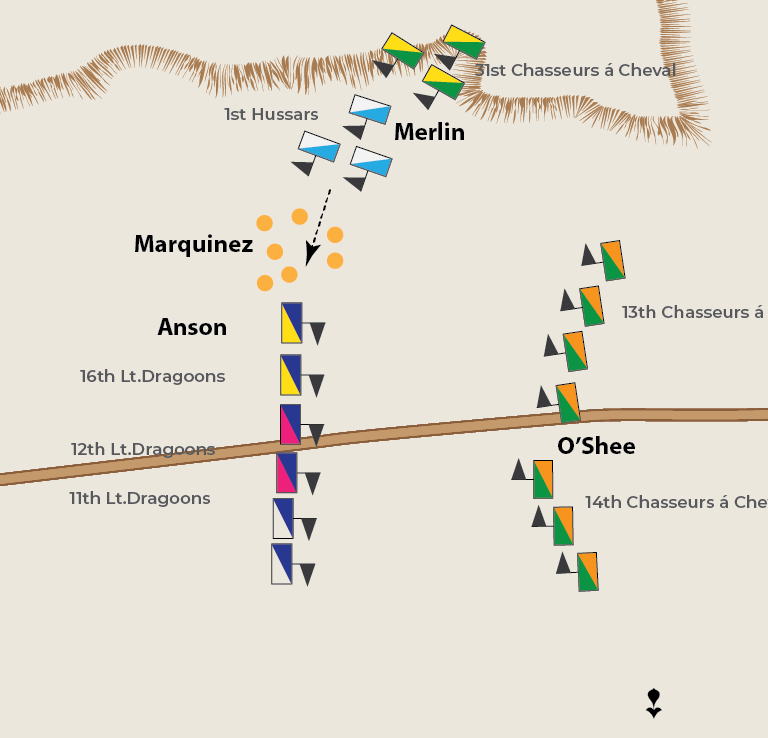
While this to-and-fro action was proceeding, Merlin’s brigade of 1st Hussars and 31st Chasseurs made their way around the right flank through the low hills. They drove off Mequinez’s guerrillas, throwing them back towards Anson’s flank. The fleeing guerrillas ran into a left-hand squadron of 16th Light Dragoons, closely followed by the 1st Hussars. The 16th was thrown into disorder and badly handled, losing some 30 casualties, including their colonel, Pelly. Seven prisoners were also lost. Anson’s brigade fell back, rattled.
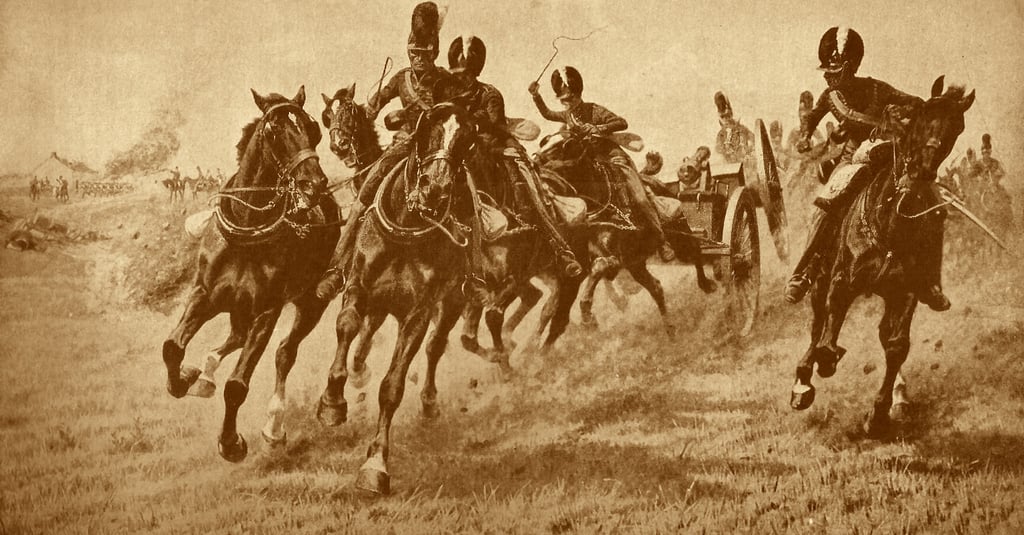
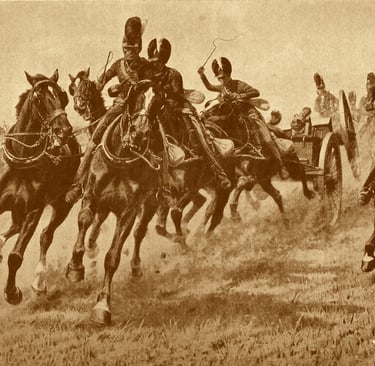
However, it wasn’t too long after that Anson’s brigade came in sight of Bock’s brigade, the two KGL light infantry battalions, and Bull’s horse artillery battery. They were posted on a wide plain situated approximately two miles northeast of the village of Villadrago. Stapleton-Cotton had formed Bock’s brigade, and the battery was in a strong position behind a deep watercourse—a marshy stream, in fact—spanned by a sturdy stone bridge. Along the banks amongst the bushes, he placed the KGL light infantry. Nearby, on the other side of the stream, was the guesthouse of Venta de Pozo.
Anson’s Brigade was ordered to retire over the bridge and form a defensive line along the ditch. The mass of French cavalry then entered the scene.The leading regiment of O’Shee’s Chasseur Brigade charged the 11th Light Dragoons before they could retire over the bridge; they counter-charged. There was a brief clash, resulting in the 11th being beaten back across the ditch. The Chasseurs pulled up, probably sensibly so, as Anson’s force was formed up on the other side of the ditch.
Cafferelli and Souham now came on the field at the same time as the cavalry reserve composed of Boyer’s dragoon brigade and Feverat’s brigade. O'Shee's Brigade and Merlin's Brigade were pulled back to reform, while Colonel Faverat's Brigade advanced to take up the fight. General de Brigade Laferriere, the original commander of Faverat's Brigade, was injured, leaving Colonel Faverat of the 15e Chasseurs in temporary command. Boyer's Dragoons provided crucial support. Souham promptly ordered Boyer's Division to flank the British position by crossing the stream further down. Almost simultaneously, he ordered a frontal attack over the bridge by Faverat’s brigade.
An unfortunate mishap
What happened next was unexpected and unplanned. Boyer couldn’t immediately find a suitable crossing point, ruining Souham’s plan of synchronising Favaerat’s attack with Boyer’s flank movement. Meanwhile, Feverat's Brigade, comprising two squadrons of the Lanciers de Berg, another two squadrons of the 15e Chasseurs, and the six squadrons of Gendarmes, galloped across the bridge in column formation. Now it was the turn of the British to experience mishaps.
After a prolonged pursuit by the enemy, Anson's brigade, somewhat disorganised, crossed the bridge and ascended the slope. Cotton's initial plan was for the brigade to deploy on the left of the guns. However, the regiments, possibly due to confusion or delayed instructions, turned to the right and began forming up behind Bock's line. Upon realising this, Cotton quickly issued orders for them to cross to the left and extend the line on the opposite side of Bull's battery. Unfortunately, an unusual error occurred as the leading regiment, perhaps attempting to shorten its route, passed to the left in front of the guns instead of moving behind them.
At the same time, perhaps seeing an opportunity, Feverat led his men swiftly over the bridge.The Lanciers de Berg veered right with one squadron of 15th Chasseurs. The second squadron of the 15th, formed up opposite Anson, along with the four squadrons of Gendarmes, began forming against Bock, the last two squadrons of which were still in the process of crossing the bridge. The British waited temporarily while Bull’s battery fired on the scurrying French; not a man was hit. Bock and Anson’s brigades then advanced upon the French.
The Decisive Clash
The two British brigades had a rough strength of 1,100 sabres: 500 in Bock's Brigade and 600 in Anson's Brigade. The French initially had roughly 1,200 sabres, as two squadrons of Gendarmes had not yet crossed the bridge. (Feverat's Brigade had a total strength of 1,600.). Both sides broke and were broken at different points in the long line. The 1st K.G.L. Dragoons rode down their immediate opponents, the left-end squadron of Gendarmes, but the 2nd K.G.L. Dragoons engaged in a standing fight with their opponents. Despite the fact that Anson's Brigade had the advantage of coming down the slope, its horses were weary from the previous actions and pursuit, and while a standing fight developed with the 15e Chasseurs, the Lanciers de Berg (who in this combat were not carrying their lances but fought with the sabre) started to force the end of Anson's line back, despite the disadvantage of going uphill.
The opposing lines were becoming totally entangled, with the left side of each side being pushed back. At this crucial point, the two remaining squadrons of the Gendarmes swung around the flanks of Bock’s line, falling on his flank and rear, while over on the other flank, the Lanciers de Berg forced there opponents back and turned the flank. The affair was over in a couple of minutes; the British line collapsed and fled.


Merlin’s brigade driving Melinquez’s guerillas into 16th Light Dragoons.
Boyer arrives at last
It was fortuitous that the melee had so disorganised the combatants, Faverat’s troopers having to halt and reform, which gave both British brigades time to rally and begin to reform, albeit about a mile. There was to be no respite; Boyer’s division arrived on the scene. They had made a 3-mile detour, finally finding a ford downstream. They advanced on the British, with Faverat in support.
Boyer’s dragoons, who were relatively fresh, gave the wavering British horsemen no time to sort themselves; they charged. The British officers ordered a charge, but the men had had enough and fled after a token advance. However, it was not yet over. Yet again, the British rallied but fled again when attacked by Boyer’s exultant troopers.
Wellington has just arrived and personally positioned Halkett’s two KGL battalions in a square formation, backed by the horse artillery. The cavalry again began reforming behind the squares. Boyer’s dragoons, who were trying to pass around the squares to get at the British horsemen, were hit by musketry in their flank. Three subsequent assaults on the squares were roughly repelled by accurate musketry and canister.
The fight ended when the British and German cavalry, covered by the two KGL battalions, gradually fell back to the river. Boyer’s dragoons were now tired out, and the battle petered out. Anson’s brigade had lost 246 casualties and 31 prisoners; Bock’s brigade, although it broke several times, suffered 56 killed and wounded plus 39 prisoners. Halkett’s infantry lost only 18 casualties. The French lost approximately 300 killed and wounded, Faverat’s brigade lost 139, and Boyer’s dragoons lost roughly 160 killed and wounded.
Aftermath and conclusion
An examination of the military engagement serves to exemplify the deficiencies in General Cotton's execution of French tactics, leadership, and basic combat proficiency. Specifically, Cotton's failure to adequately secure the left flank played a pivotal role in the severe damage suffered by the 16th Light Dragoons when attacked from the flank by Merlin.
Certain historians attempt to attribute the defeat to the exhaustion of British and German horses after prolonged and arduous campaigning. However, this claim is unsubstantiated, as both brigades had ample time to recuperate before the encounter, unlike the French forces that had marched extensively along the coast of Spain without respite. Additionally, the British and Germans rode superior British Hunters, while the French relied on less capable remounts and aging French mounts, as supported by Napier.
Some historians wrongly accuse Anson of placing his brigade in a position that hindered the artillery's ability to fire on the bridge. In truth, Cotton had positioned the artillery too far back to effectively employ grape or canister shots on the bridge. Anson's Brigade was correctly positioned to the left of the battery, ensuring a clear field of fire.
The French offensive strategy was straightforward yet astute. Faverat's Brigade engaged the British forces at the front, diverting their attention, while Merlin and Boyer executed a flanking manoeuvre through the hills on the left of the plain, effectively outflanking the entire British position. The French exhibited a sequential utilisation of their units, preventing overburdening and ensuring a continual rotation of fresh units into the fray. The combination of Boyer's concealed flanking manoeuvres and Faverat's direct assault exemplified professionalism in French command, coupled with remarkable courage and discipline among the troops. The victory resulted from a blend of intelligent tactics, strategic manoeuvres, and sheer bravery, overcoming a formidable enemy force entrenched in a robust defensive position. A simplistic dismissal of the British defeat is insufficient.

